Use JAKA Dashboard Template
Use JAKA Dashboard Template
This page aims to give a detailed guide on how to use the Dashboard function template to create a JAKA AddOn Webpage.
We have pre-set some robot operation templates in the JAKA Node-RED Examples. Users can directly use these templates to create webpages, or modify these templates based on their needs. These templates combine the widget (like input, button and dropdown) with JAKA Custom Service together to achieve specific functions.
Import the Template
Users can get all the pre-set templates in Node-RED, and directly use them after deployment. Users can also import the required widgets in different templates for combination, deployment and use.
What You Should Know About Dashboard
Layout
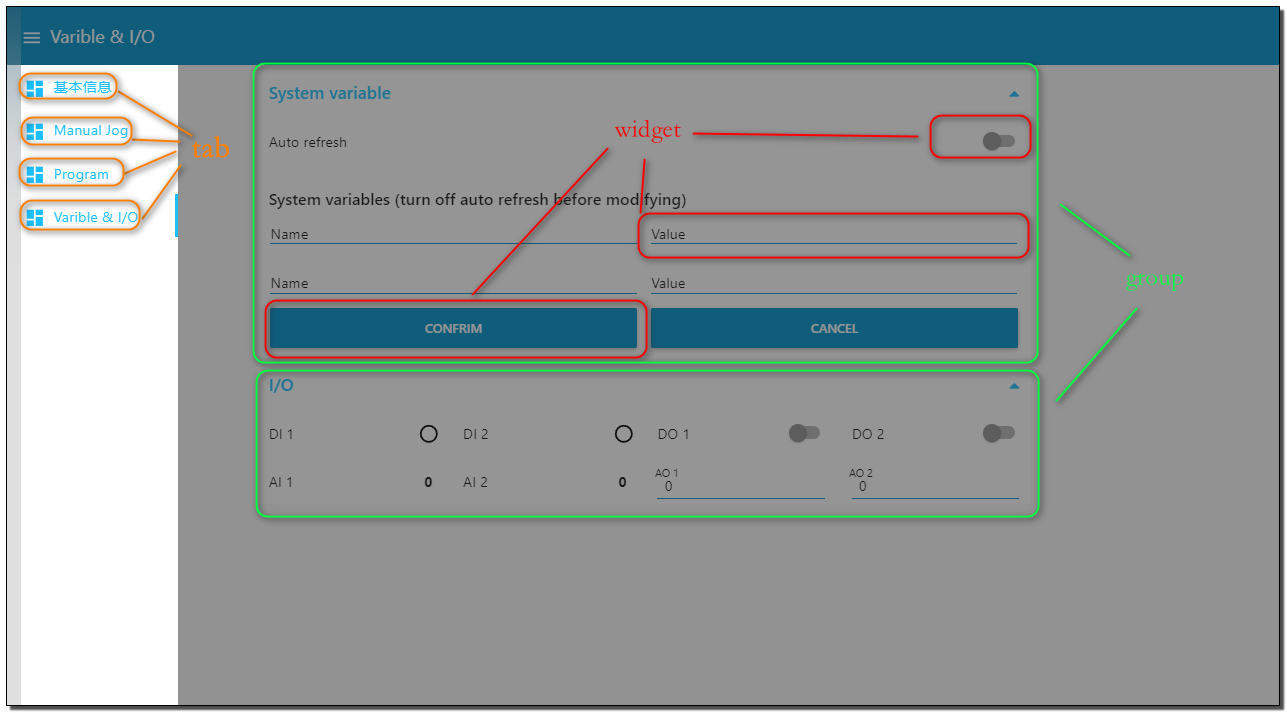
The dashboard layout should be considered as a grid.
Every Tab can be seen as a webpage. One Tab can contain multiple Groups, and one Group can contain multiple Widgets. When editing Widget, users can designate its Group. When editing Group, users can designate its Tab.
Each Group element has a width - by default 6 'units' (a unit is 48px wide by default with a 6px gap).
Each Widget in the group also has a width - by default, 'auto' which means it will fill the width of the group it is in, but you can set it to a fixed number of units.
The layout algorithm of the Dashboard always tries to place items as high and to the left as they can within their container - this applies to how groups are positioned on the page, as well as how widgets are positioned in a group.
When the template has been imported, the widgets within might be displaced. Users can reset its layout, or adjust it to whatever is preferred.
List of Templates
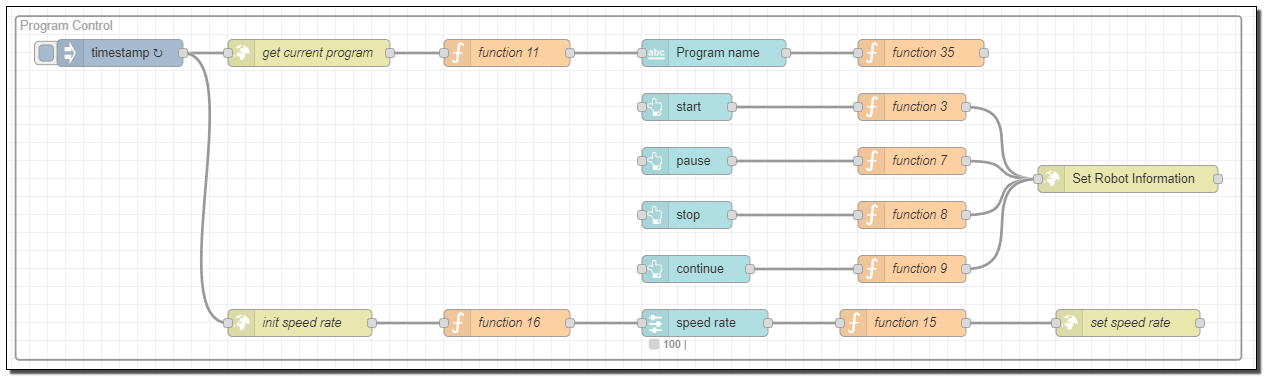
Control the Program
To start, pause, resume and stop the program
This template contains the use of input, button and slider.
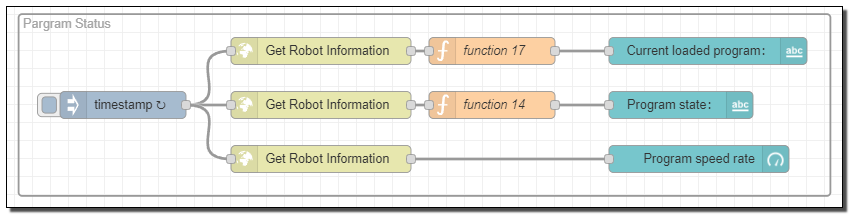
Check the Status of the Program
To check the currently loading program and its running speed and status.
This template contains the use of gauge.
Control the Power Supply
To control the robot's power supply and status

The "One-click start up" would power on the robot first. After so, it automatically cycles to detect whether the robot has been successfully powered on or not. If the answer is yes, it would continue to enable the robot. Users can modify the time period of cyclic detection in "delay".
Robot Status
To monitor the robot's various statuses
This template contains one widget that can catch every error code and status code of the robot since it is started up. And one line chart widget that can show the status of the robot, such as the controller's temperature and the robot's speed, etc.
Note
This demo video is recorded using a virtual machine, therefore, the data on the controller's temperature and power are empty.
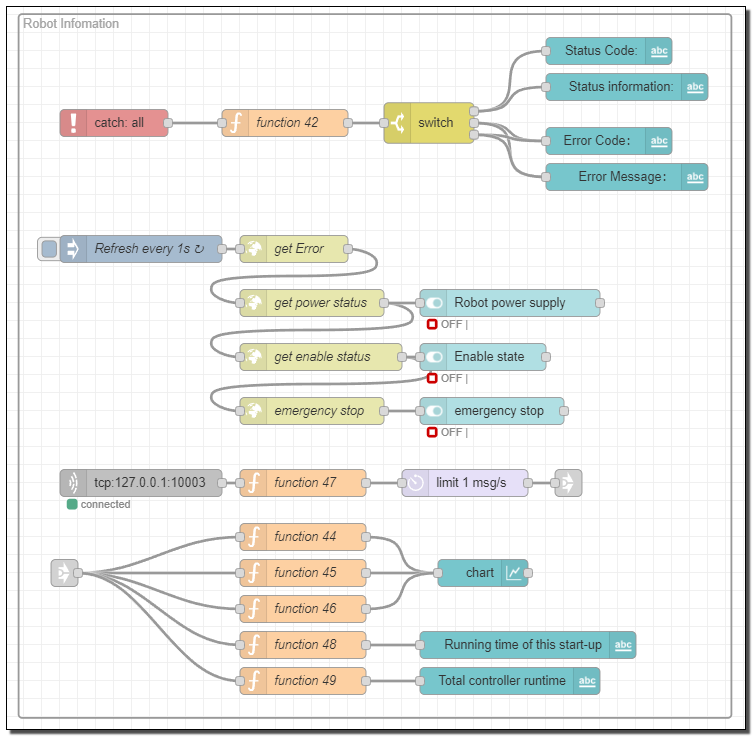
To catch the error codes and status codes of the robot
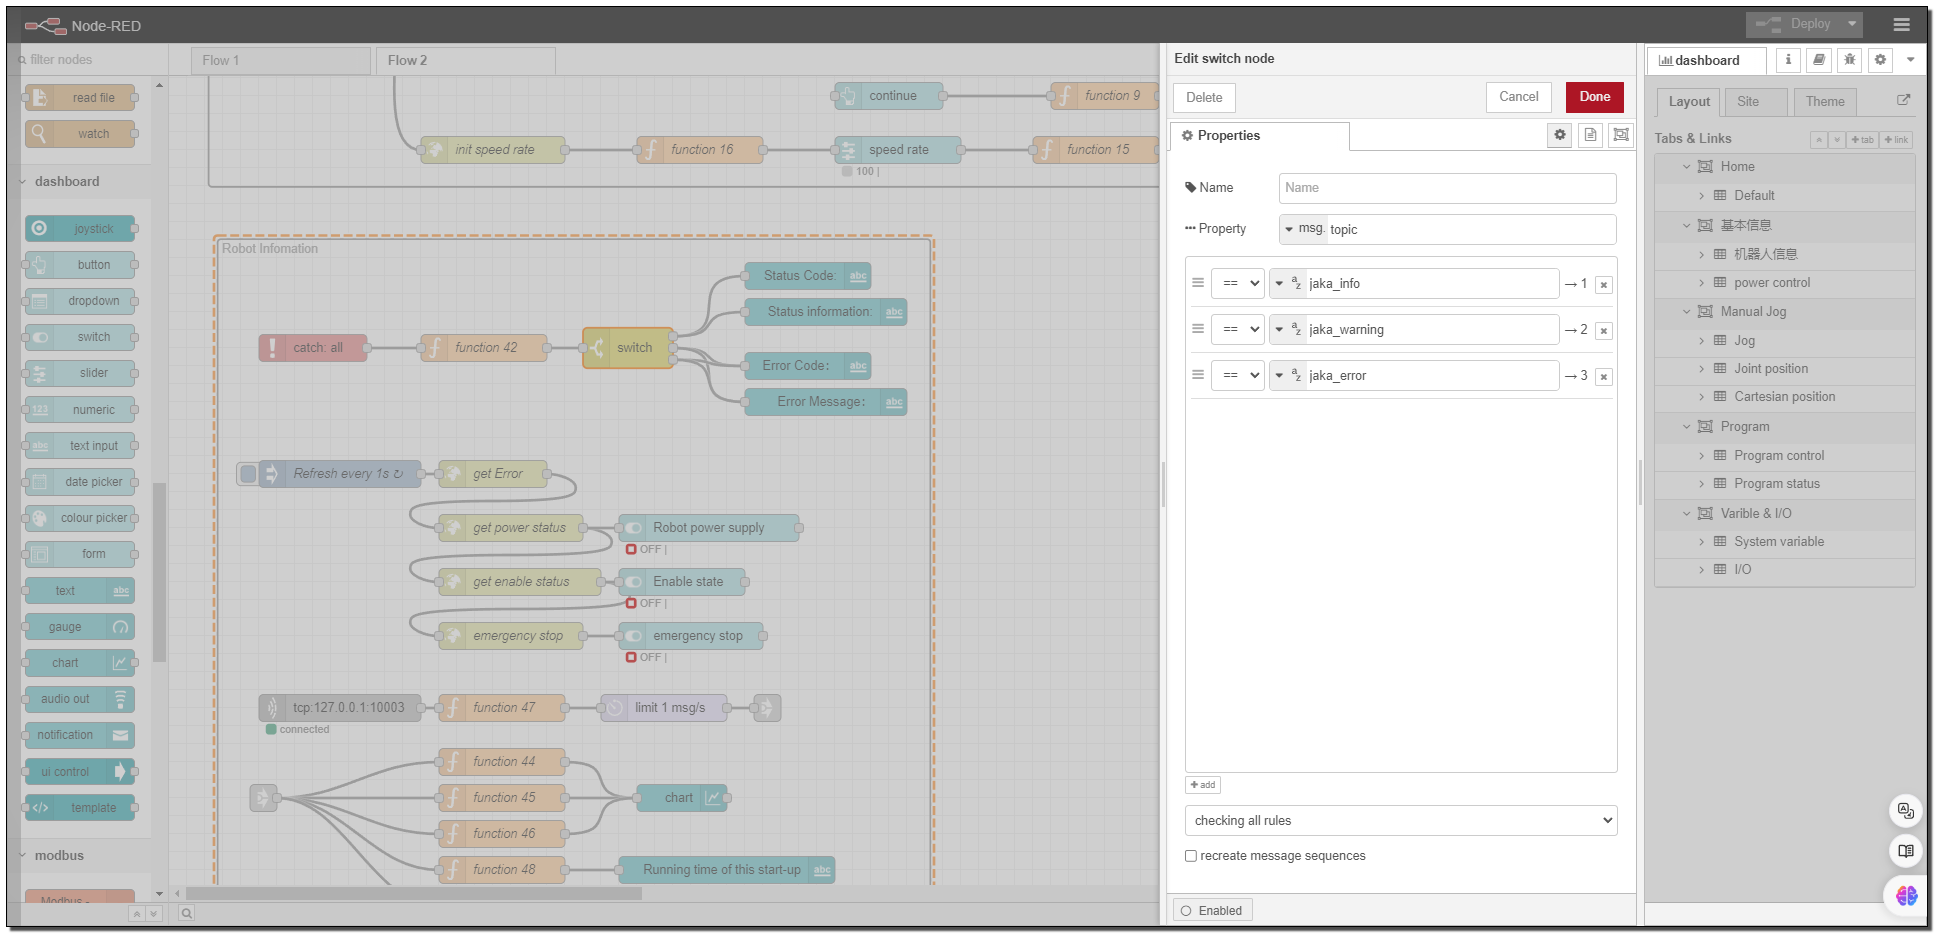
In order to thoroughly catch the required information, users are suggested to use the catch to catch all error codes and status codes while using the "Get robot information" node to refresh these error codes and status codes. Then use the switch node to group them for display on the page.
The codes caught by "Get robot information", "Set robot information" and "Robot motion control" have three topic:
- jaka_info:information
- jaka_warning:waring
- jaka_error:error
Status Icon
Use the Switch widget in Dashboard to select different icons to present different status.
Information on the Chart
The information gained from port 10003 can be monitored by tcp in. To prevent the page from crashing due to frequent refresh, users can use delay node to regulate the amount of passed information.
Then use the link out node to send the monitored information. Afterwards, users can use link in node to receive information send by port 10003 in Node-RED.
Port 10003 pushes data with timestamp every 80ms, making it very suitable to get data that requires high frequency of refresh and in-time updates, such as the current location, power limit, torque, etc.
Jog the Robot
Using the Joystick to Control the Robot Movement
This template contains joystick widget and dropdown widget.
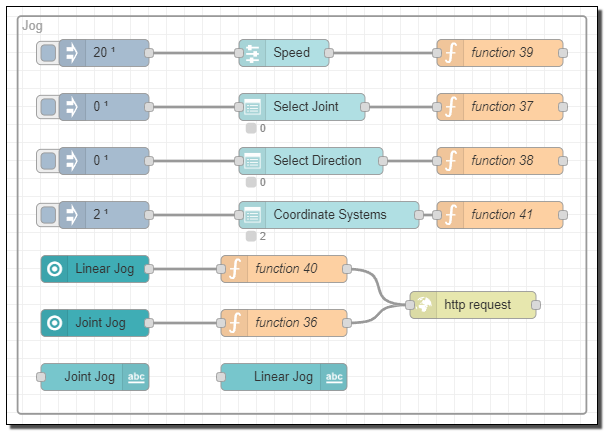
This template supports Linearity Jog and Joint Jog. Only one direction or joint can be jogged at one time. In linearity jog, the world coordinate system and TCP coordinate system can be switched at anytime.
Get the Robot Position
To Get the In-time Position of the Robot
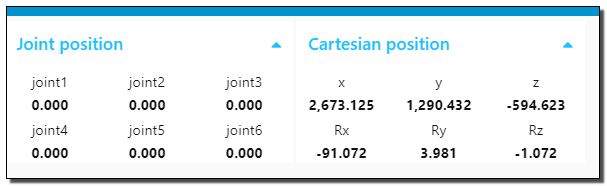
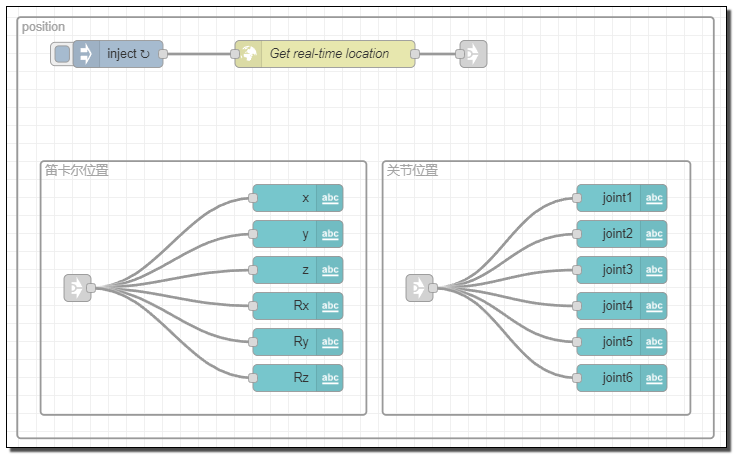
This template uses JAKA customized Get robot information node to get the robot's position. But the time lag between the request and the receiving of position data cannot be assured, given that the http is used to request. If the user needs to get the position with high frequency, or needs to get positions with an accurate timestamp, data from port 10003 is suggested.
System Variables
To monitor and set the value of system variables. The monitored data is accurate when the program is running.

This template can monitor and set two variables by default. If more variables are needed, please modify the system variable form.
Note
The name of new added variables needs to start with varName varValue and a number. The number shows the sequence of these new added variables.
I/O Panel
To monitor and set the I/O value
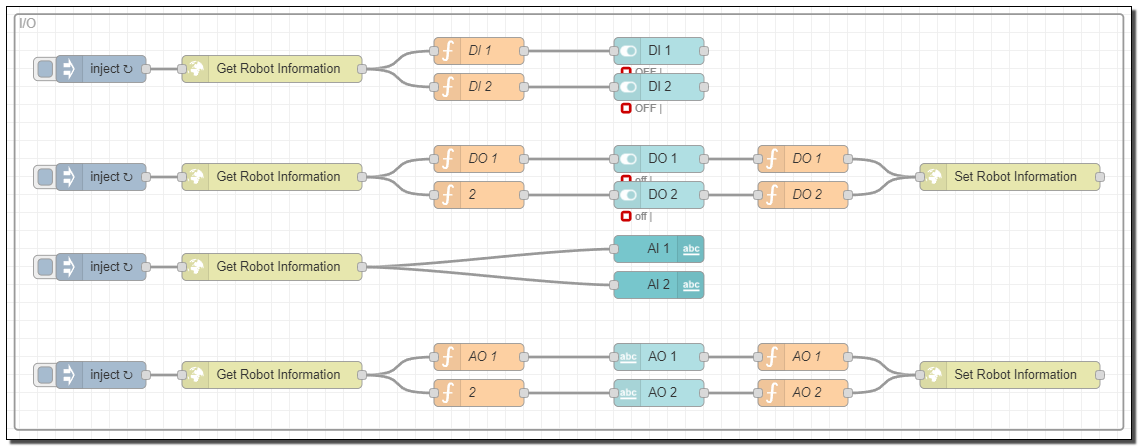
Add I/O numbers
The video below illustrates how to add more I/Os.
Switch the I/O source
The video below illustrates how to switch the source of DI from Modbus slave to control cabinet.