Quick Start
Quick Start
Documentation
JAKA SDK is an efficient toolkit designed to help developers easily interact with JAKA robots. SDK provides a set of interfaces to support device connection, control, data transmission and other functions. Through this guide, you will be able to build your own application based on the SDK provided by JAKA in a short time and realize basic interaction with JAKA robots.
Get JAKA SDK
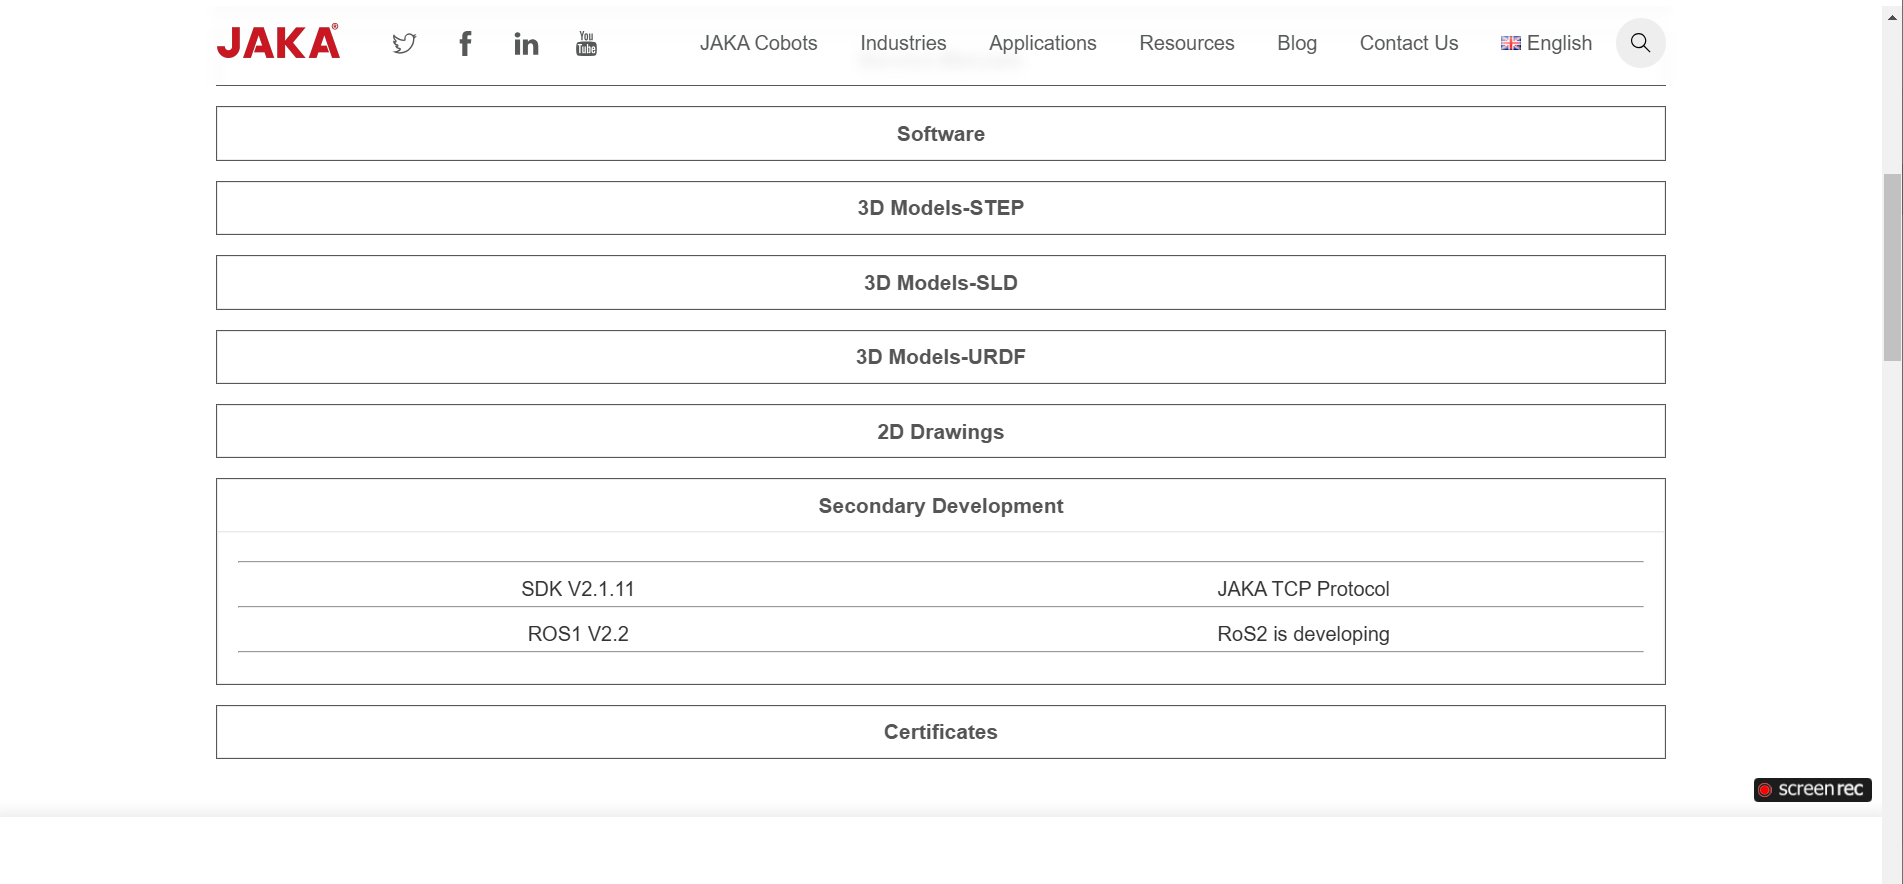
The JAKA SDK software package can be downloaded from the JAKA official website. The English version can be found on the English official website https://www.jakarobotics.com/, click [Resources] --> [Download] --> [Technical Information] --> [Secondary Development] to view the latest and historical versions.
Writing User Programs
To help users quickly build their first application on different platforms, this article uses three example(click here to download demo) to illustrate how to use different compilation tools to create applications on Windows and Linux platforms:
Create C# applications using Microsoft Visual Studio on Windows;
Use CMake to create C++ applications on Linux;
Use Qt Creator to create Qt applications on Linux.
Creating C# Applications with Visual Studio on Windows
Compilation environment installation
Users need to download and install the Microsoft Visual Studio programming platform software. Please install it according to the online resources. The following description assumes that the reader has installed the software. During the deployment of the C# development environment, you may be required to update the .NET framework. Please deploy it according to the requirements (the .NET framework for this project is .NET6.0 when it runs normally).
Create New Project
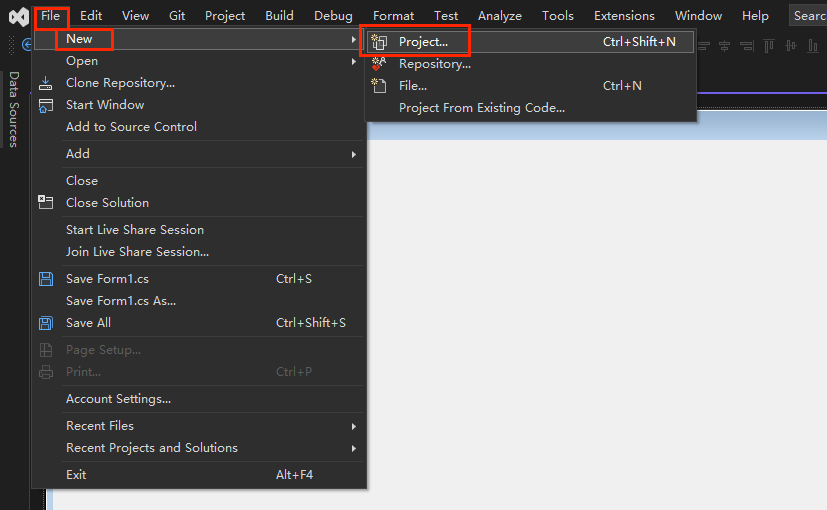
Open the software and click File-->New-->Project in the upper left corner, as shown in the figure below.
In this example, we choose to create a form application.
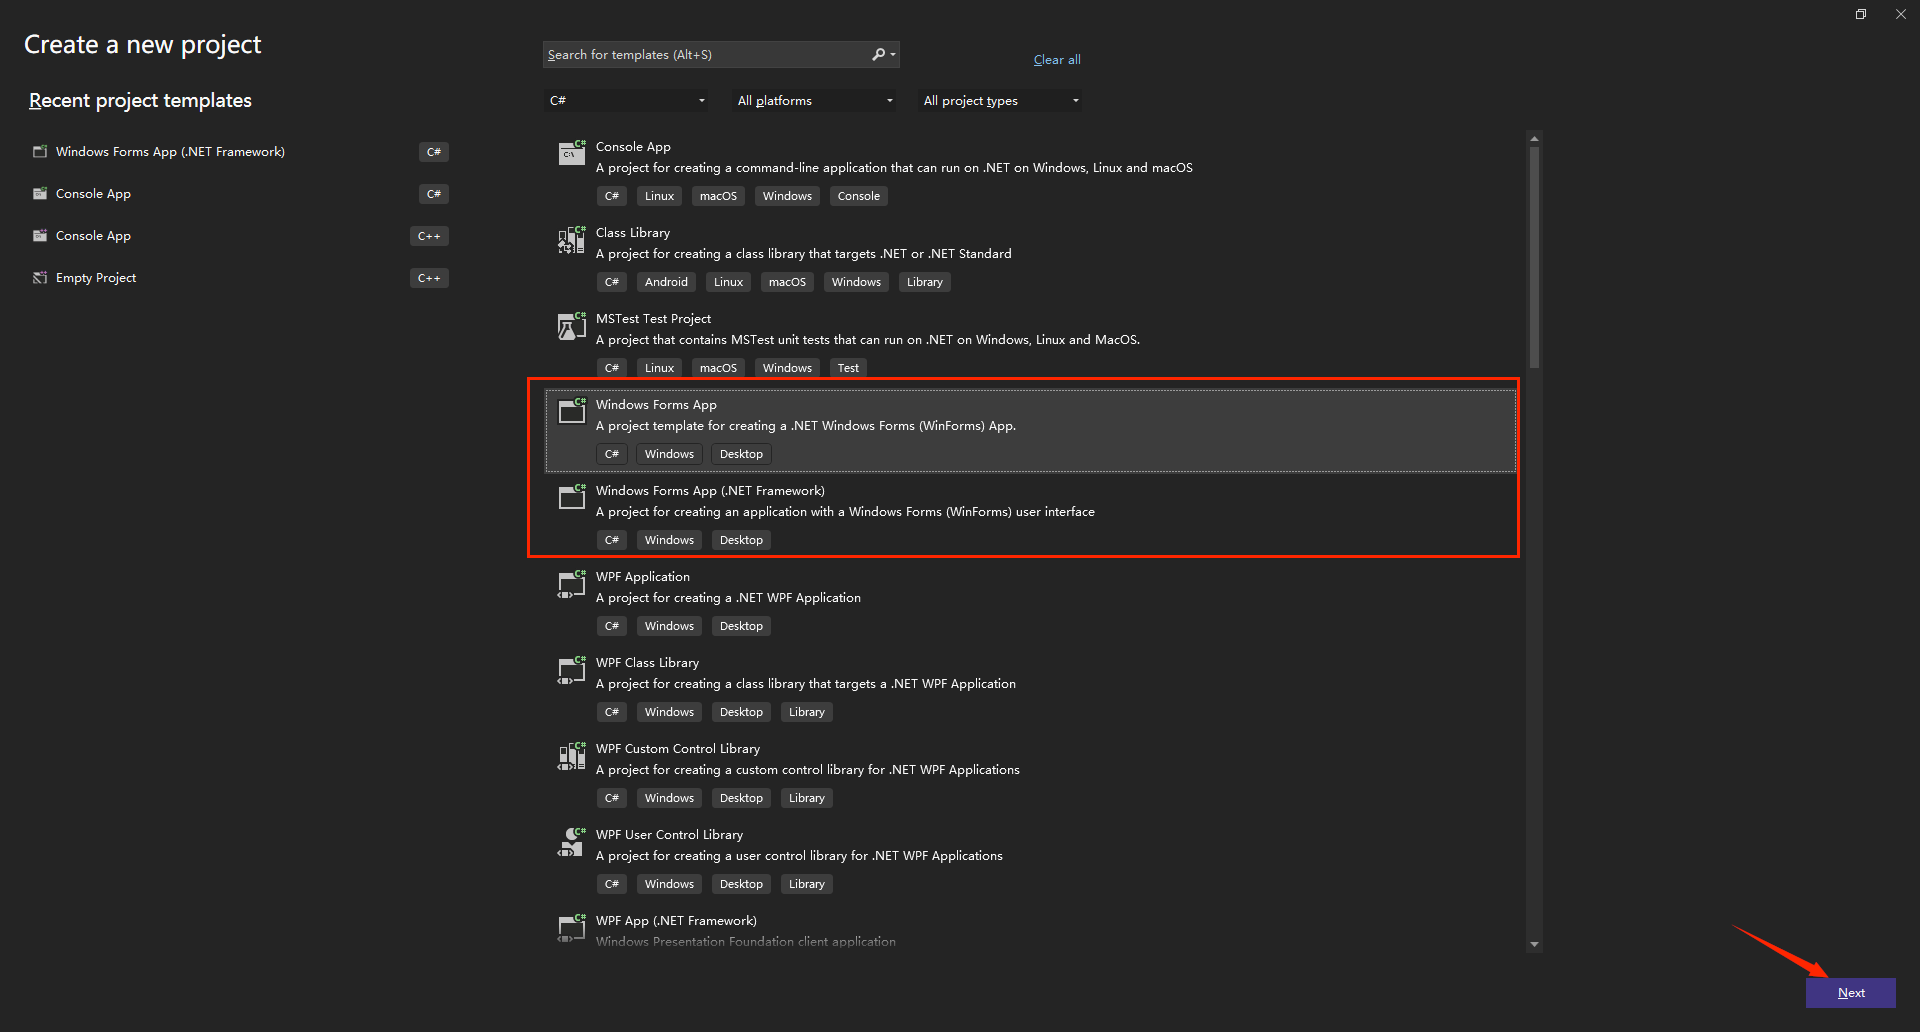
Click Next.
If you need a cross-platform application, it is recommended to select Windows Form App;if it only runs on Windows, you can select Windows Forms App (.Net Framework). Click Next.
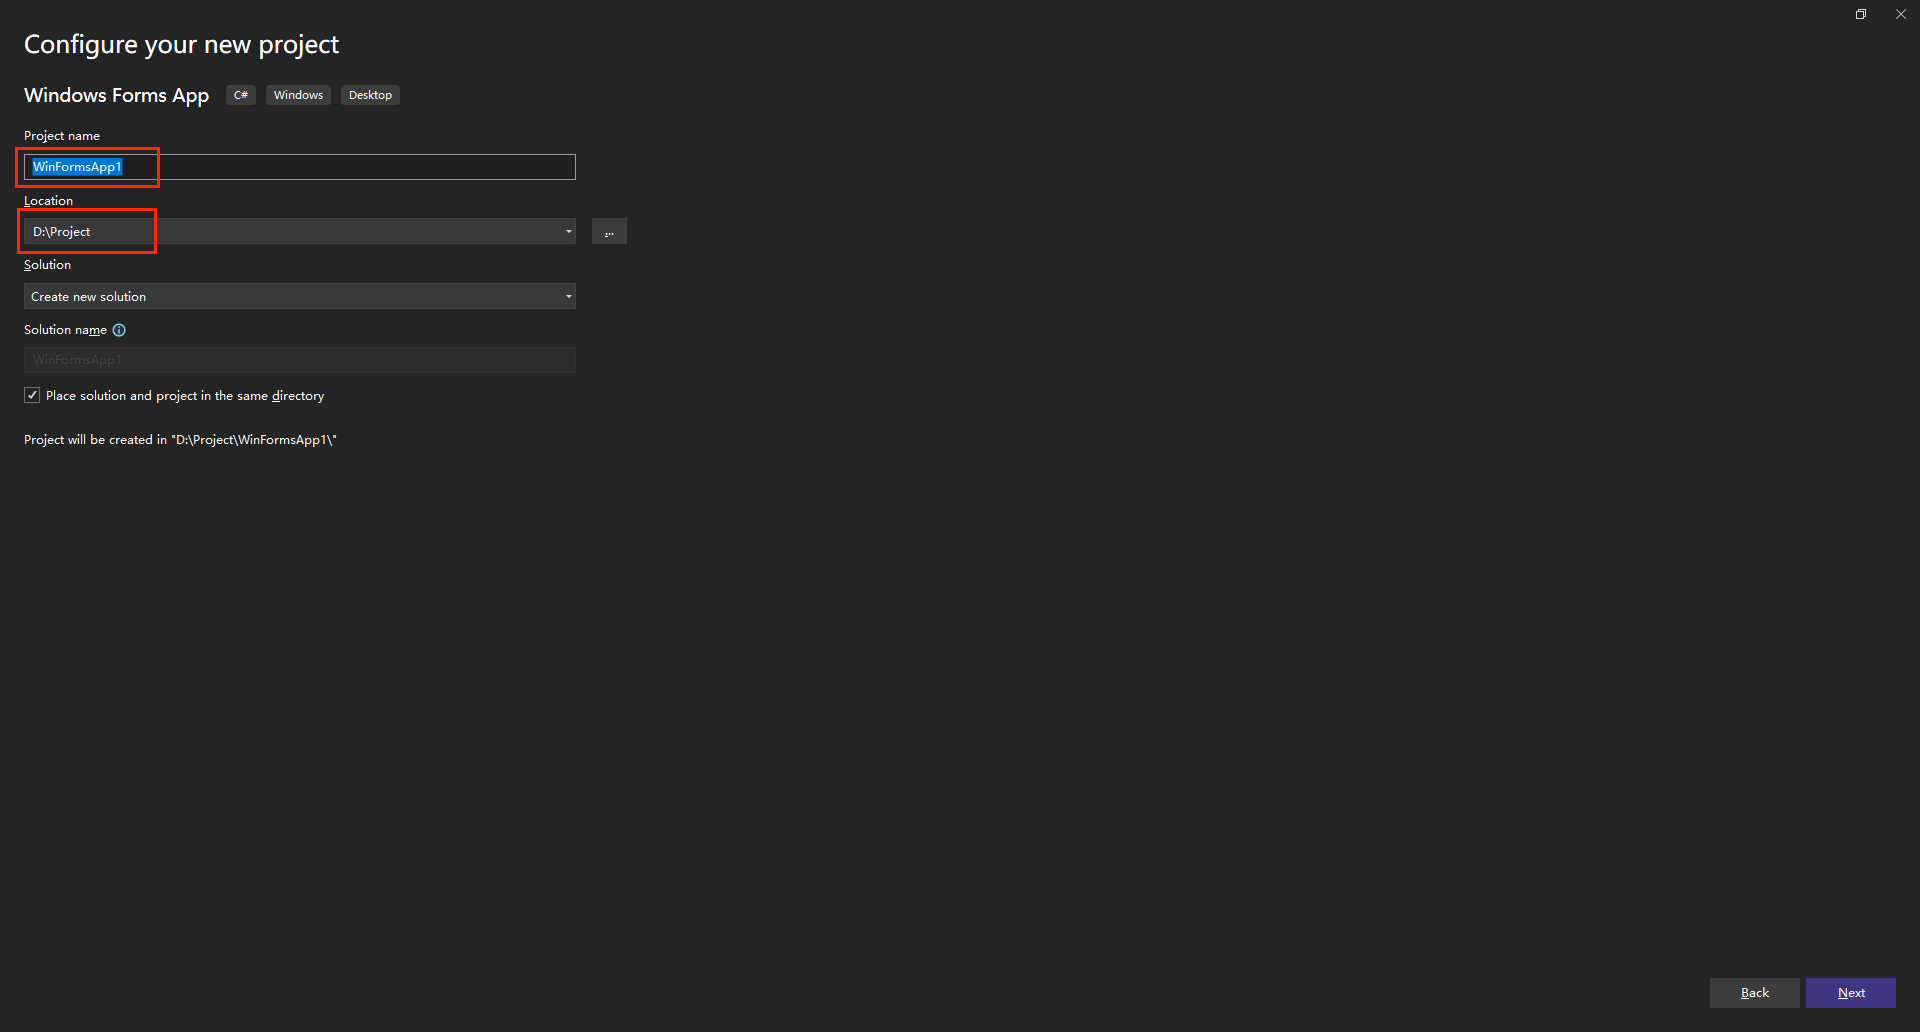
After further setting the project name and storage location, click Next until the project is created.
Compile and Link Environment Configuration
After decompressing the SDK software package downloaded from the JAKA official website, you can see the file directory as follows.

For Windows C# application development, you can find the include (containing header files) and x64 (containing library files under Windows 64-bit system) directories in the Windows\csharp directory.

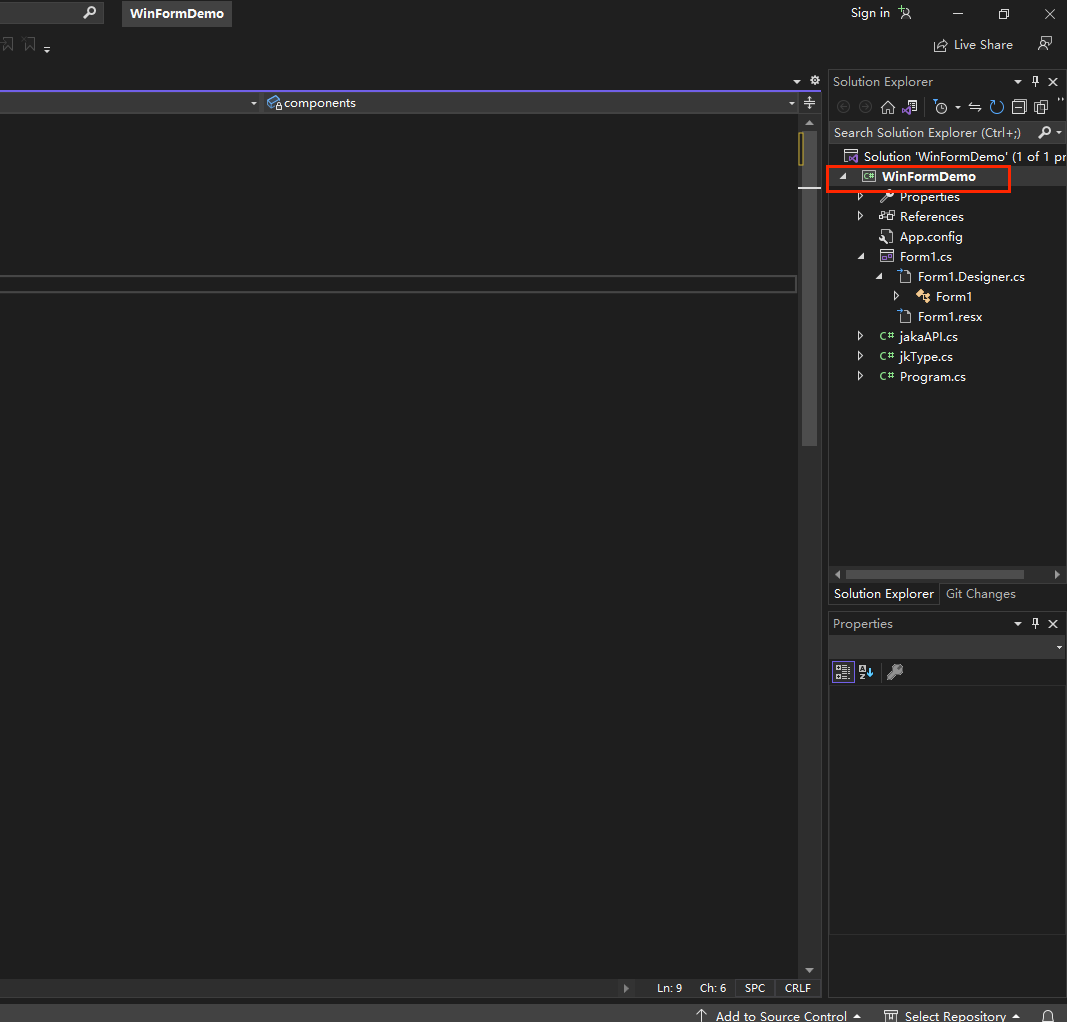
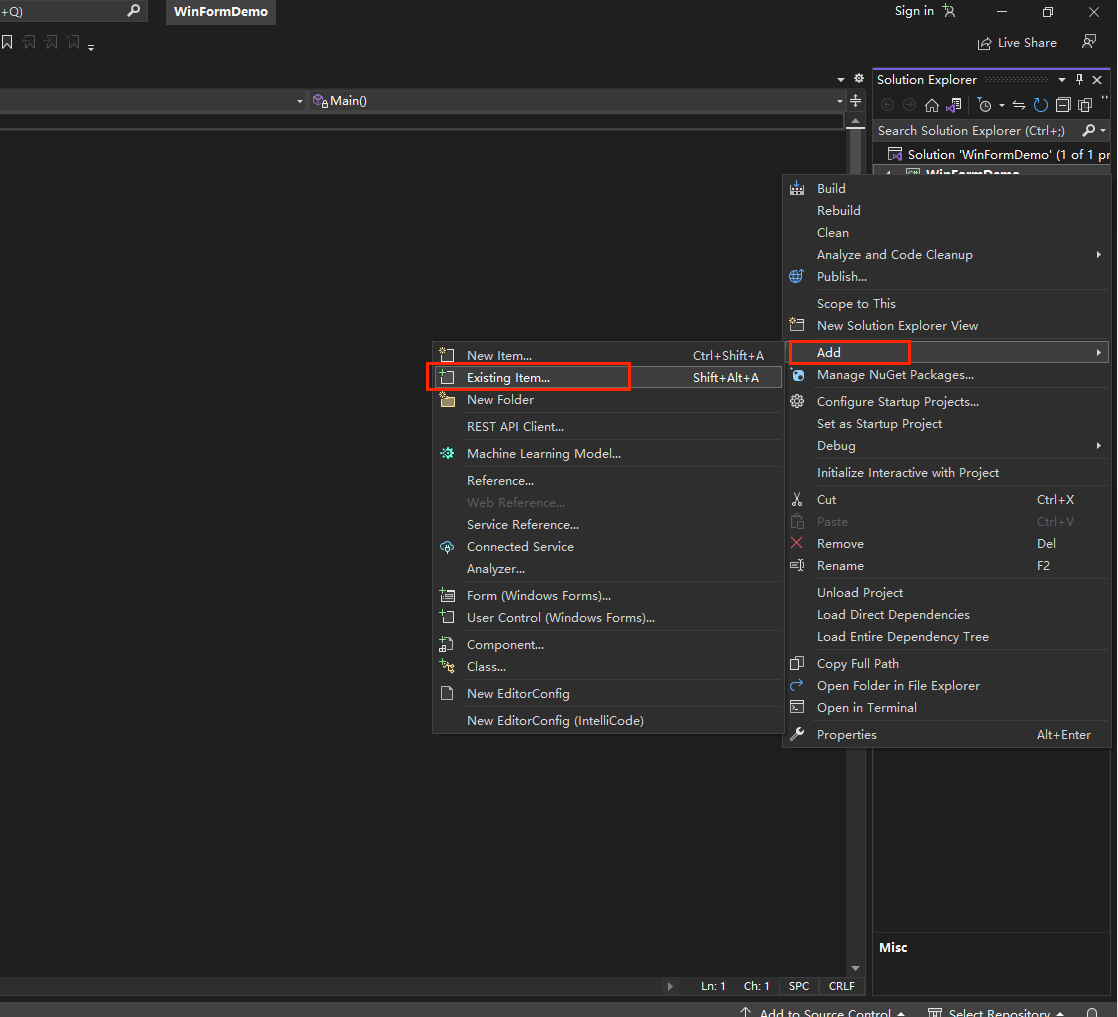
Enter the newly created project, click Add--->Existing Item in the right sidebar, and add the two header files in the include folder: jakaAPI.cs and jkType.cs to the project.
Put the C# shared library file in the SDK package into the main program directory of the project, usually in the bin directory.

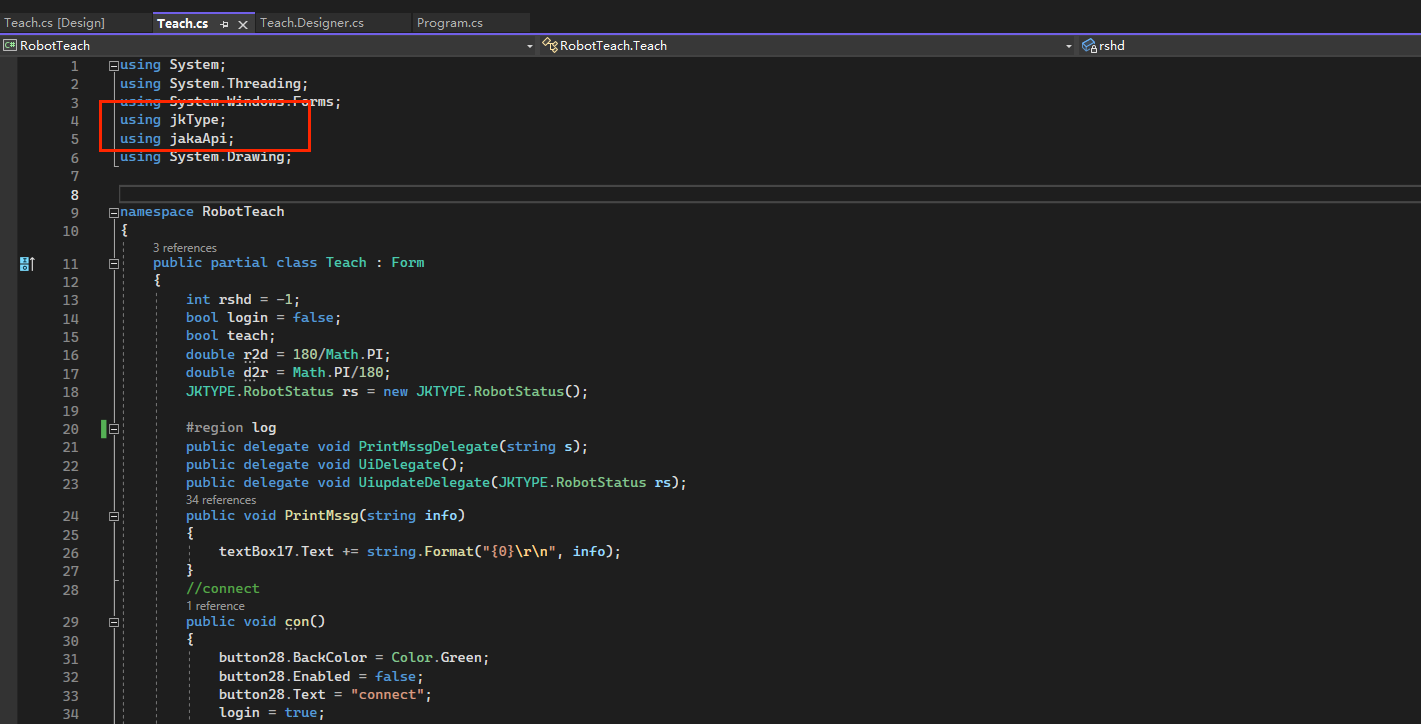
Add the following two lines of code in the user program so that the types and methods defined in the JAKA SDKcan be used in subsequent codes.
using jkType;
using jakaApi;
Writing an application
After creating the program, you can develop the interface and corresponding functions according to your needs. After completing code editing, click [Build]->[Build Solution] to compile and generate an executable program. Finally, click the Start button on the toolbar to execute or debug the program.
The example provides a demonstration program for robot teaching, which includes the following functions: connection, power-on and enable, joint space motion control, Cartesian space posture control, etc. Customers can refer to the sample code for specific implementation.
Creating C++ Applications with CMake on Linux
Download and install CMake tools
It is recommended to download the installation package for the corresponding platform from the official website Cmake official website. This example uses Cmake version 3.7.2, and it is recommended to use this version or above. (For specific installation operations, please read the online resources, download and install them yourself) The following instructions assume that the reader has completed this operation.
After the download is complete, enter cmake --version in the terminal. If the following content is displayed, it means the installation is successful.
jakauser@ZuCAB2001:~$ cmake --version
cmake version 3.7.2

CMake suite maintained and supported by Kitware (kitware.com/cmake).
Download and install Visual Studio Code
Users can go to the Visual Studio Code official website (https://code.visualstudio.com/Downloadt) to find the software installation package and download and install it. After VS Code is installed, please install the CMake extension in the Visual Studio Code extension.
Write the Project Framework and Configure CMake
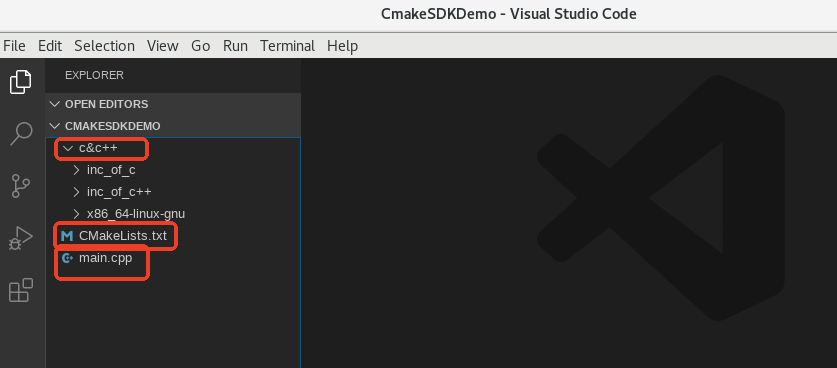
Create a new project folder CmakeSDKDemo under Linux and create the following files, where c&c++ are resource files under Linux in the SDK package provided by JAKA, including header files inc and dynamic library files. main.cpp is the main file of the project, and CMakeLists.txt is the Cmake configuration file. Please pay attention to the capitalization.
Next, use Cmake to write and run a simple hello world program. First, enter the following in CMakeLists.txt.
cmake_minimum_required(VERSION 3.5)
project(JAKADemo)

add_executable(hello main.cpp)
- cmake_minimum_required: Specify the minimum version requirement of CMake;
- project: Define the project name;
- add_executable: Add an executable target, the first parameter is the target name, the second parameter is the source file list.
Tips:
Note: This project uses the gcc compiler by default, as shown below. Please configure the C++ compiler by yourself.

Write the main program main.cpp and enter the following code.
#include <string>
#include <iostream>

int main(){
    std::cout << "hello world" << std::endl;
}
After that, we configure CMake. Enter cmake . in the terminal to configure the entire project. Then the configuration files required for building will be generated under the project file.
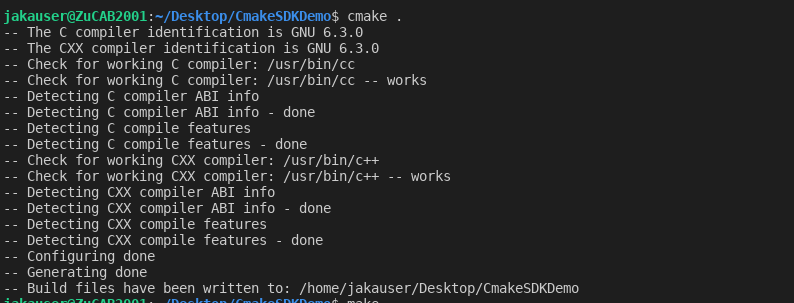
After the generation is complete, enter the make command in the terminal to build and compile the executable program.
A hello executable program will be generated in the current directory.

Enter the ./hello command in the terminal. Execute the program and the result is as follows.

At this point, running a simple helloworld program with CMake is complete.
Link JAKA SDK library
Enter the following content in the CMakeLists.txt file.
Please refer to the comments for the function of each line of configuration.
cmake_minimum_required(VERSION 3.7.2)    # Minimum CMake Version
project(sdk_test VERSION 1.0)     # Project Definition

# C++ Standard
set(CMAKE_CXX_STANDARD 11)
set(CMAKE_CXX_STANDARD_REQUIRED true)

# Source Directory Information
message(${CMAKE_SOURCE_DIR})

# Executable Creation
add_executable(demo main.cpp)

# Set the header file path of the SDK included in the project
target_include_directories(demo PUBLIC ${CMAKE_SOURCE_DIR}/c&c++/inc_of_c++)

# Set the SDK dynamic library link path
target_link_libraries(demo ${CMAKE_SOURCE_DIR}/c&c++/x86_64-linux-gnu/shared/libjakaAPI.so pthread)
Write the main.cpp file and implement the control sample code through the SDK as follows: The functions implemented in this example are to print the SDK version information, obtain the current TCP position, and move the robot with a certain distance along the y-axis.
#include <string>
#include <vector>
#include <iostream>
#include <chrono>
#include "JAKAZuRobot.h"
#include <thread>
int main(int argc, char** argv)
{

    JAKAZuRobot demo;

    demo.login_in("192.168.164.222");
    //sleep(2);
    demo.power_on();
    //sleep(2)
    demo.enable_robot();
    //sleep(2);

    CartesianPose tcp_pos;
    int ret;
    char ver[100];
    demo.get_tcp_position(&tcp_pos);
    demo.get_sdk_version(ver);

    std::cout << "SDK version is :" << ver << std::endl;
    std::cout << "tcp_pos is :\n x: " << tcp_pos.tran.x << "y: " << tcp_pos.tran.y << "z: " << tcp_pos.tran.z << std::endl;

    std::cout << "tcp_pos is :\n rx: " << tcp_pos.rpy.rx << "ry: " << tcp_pos.rpy.ry << "rz: " << tcp_pos.rpy.rz << std::endl;
    auto now = std::chrono::system_clock::now().time_since_epoch();
    auto ms = std::chrono::duration_cast<std::chrono::milliseconds>(now).count();
    std::cout << "Current s: " << std::fixed << ((double)ms) / 1000.0f << std::endl;
    tcp_pos.tran.y = tcp_pos.tran.y + 60.0;
    ret = demo.linear_move(&tcp_pos, ABS, TRUE, 10, 10, 1, NULL);
    std::cout << "ret==" << ret << std::endl;
    std::cout << "linear_move finish! " << std::endl;
    now = std::chrono::system_clock::now().time_since_epoch();

    return 0;
}
After all the above are prepared, configure and build the entire project through cmake. It is recommended to create a new build directory under the project root directory to store the intermediate files generated by the build to avoid complex file contents.
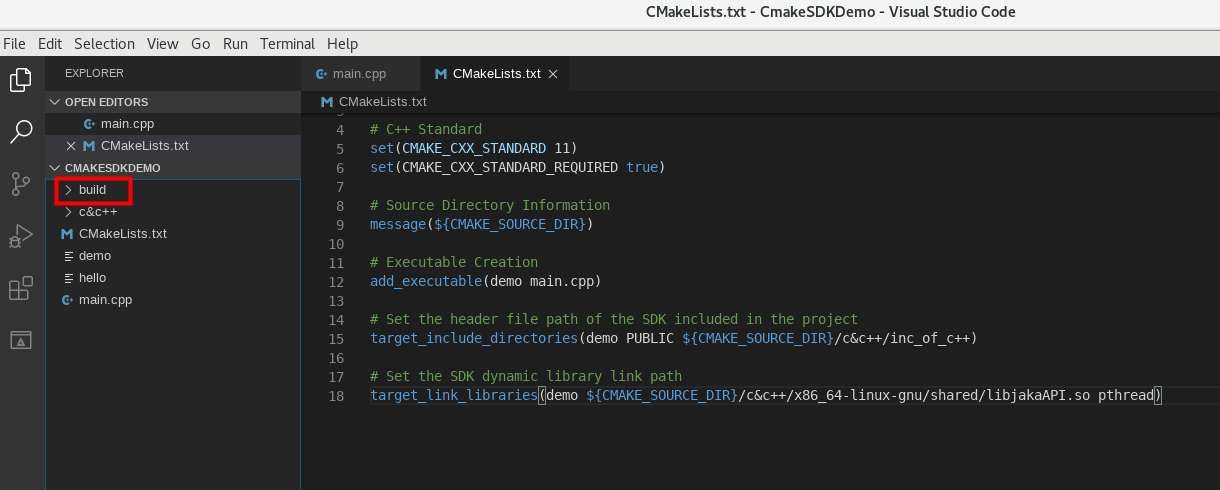
Then, enter the build directory with cd build and run the command cmake .. to build the entire project. The system will automatically put the generated intermediate files into the build directory. (Note that it is cmake .., which represents the parent directory of the directory where CMakeLists.txt is located).
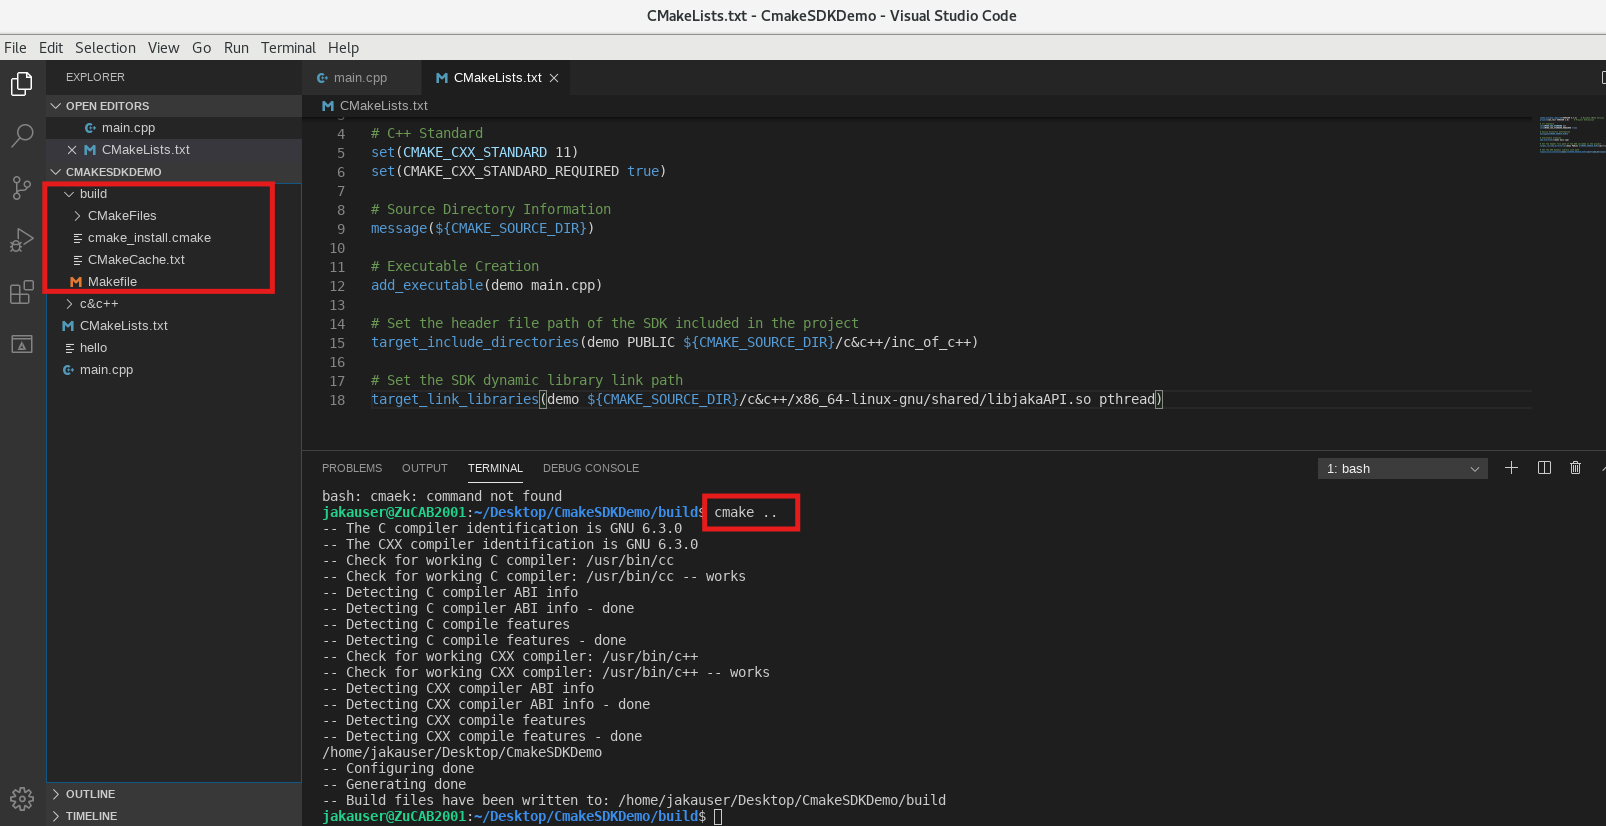
Then enter make in the terminal to build and compile the executable program.

After the above is completed, a demo executable program will be generated in the build directory. Readers can run the C++ program by running ./demo in the terminal.

Through the above steps, the reader's C++ program is written and can be run successfully.
Creating Qt Applications with Qt Creator on Linux
Download and install Qt Creator
Users can go to the Qt Group official website [https://www.qt.io/download-dev] to find the software installation package and download and install it. After Qt Creator is installed, start Qt Creator and the interface is as shown below.
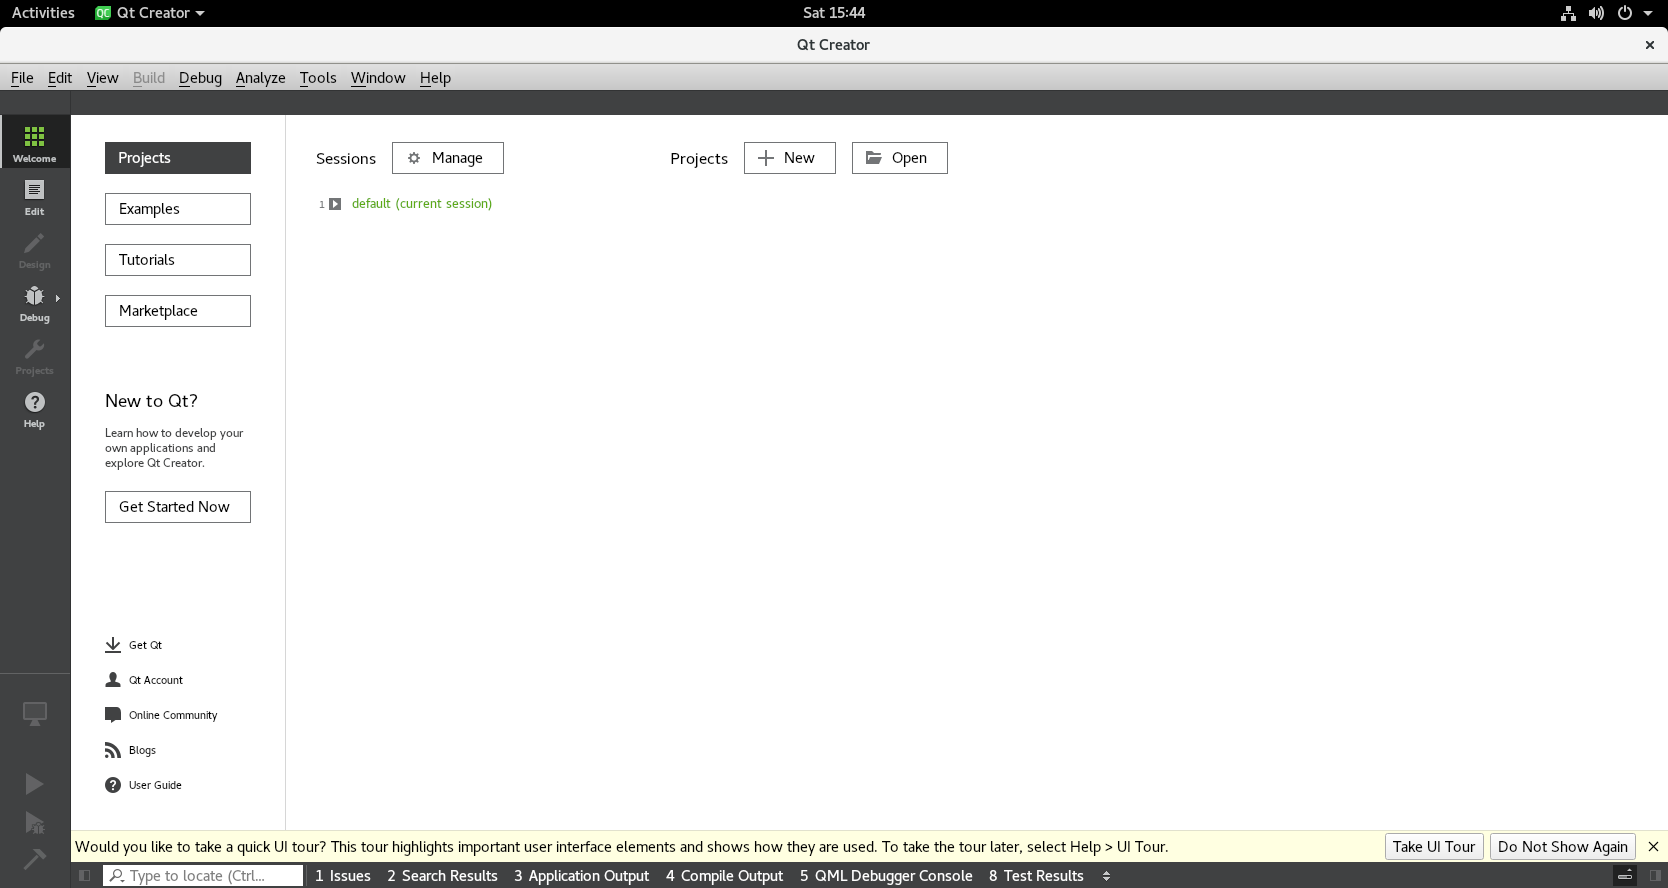
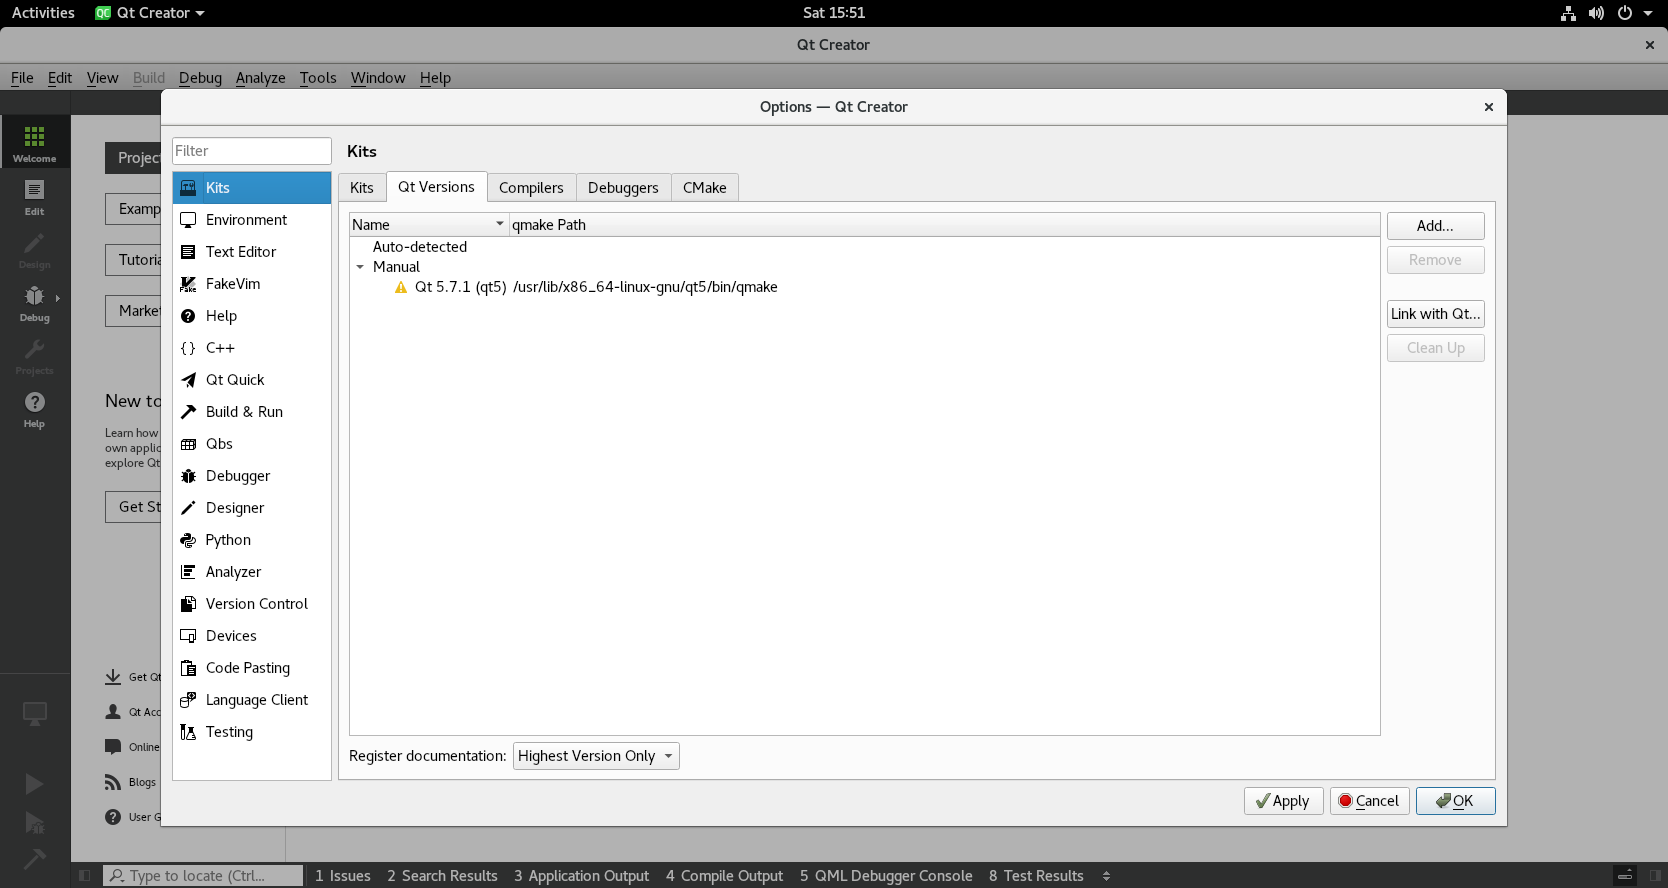
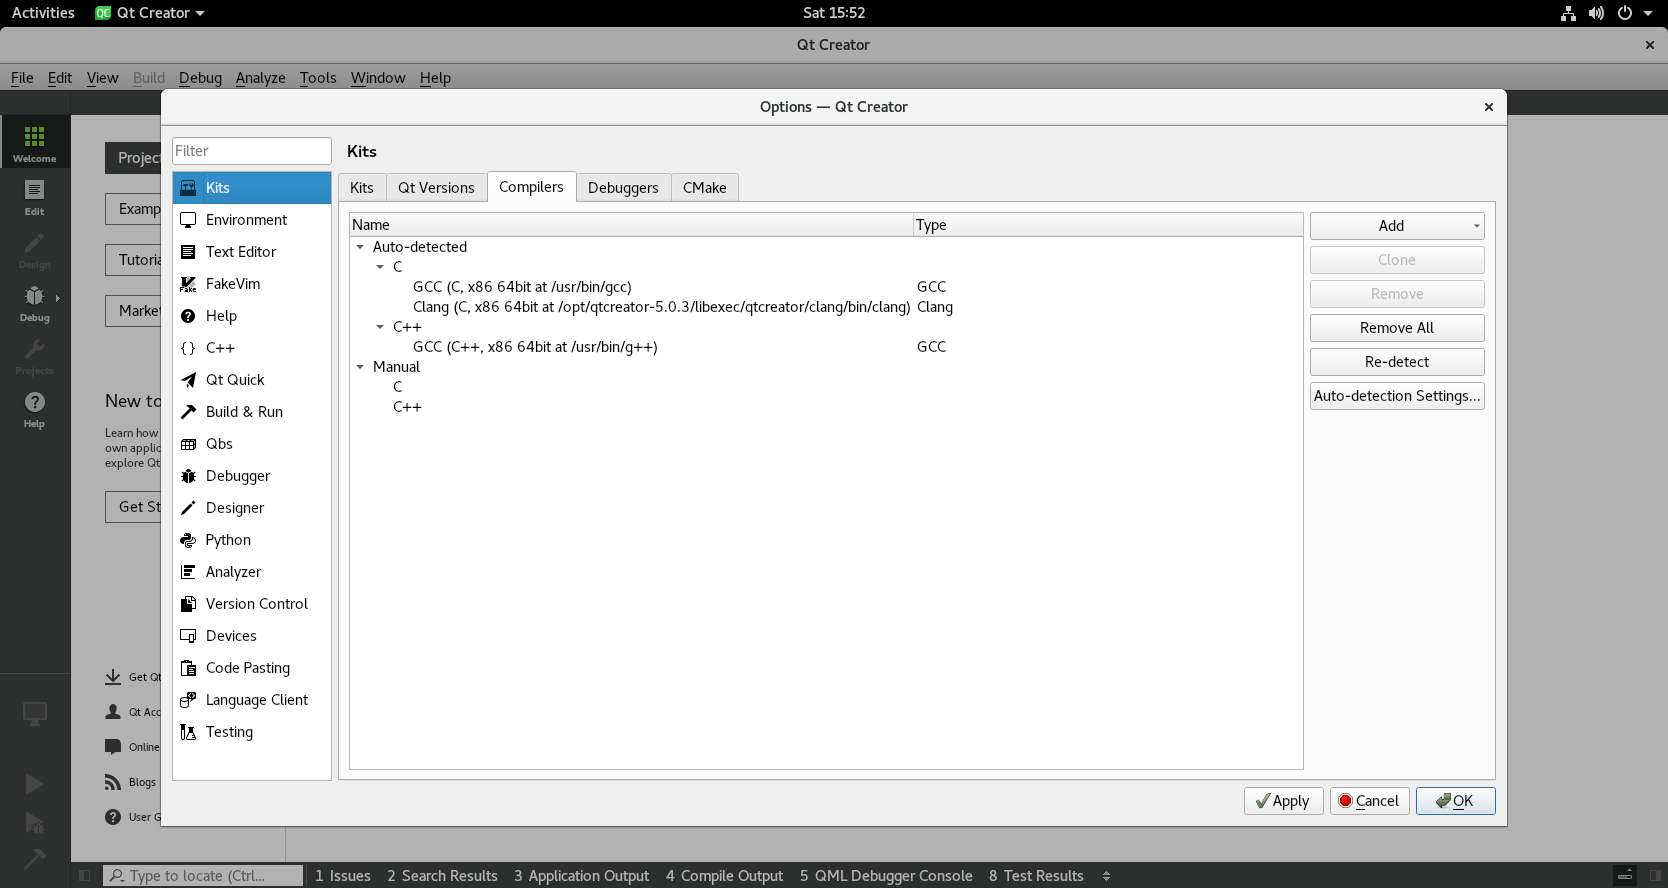
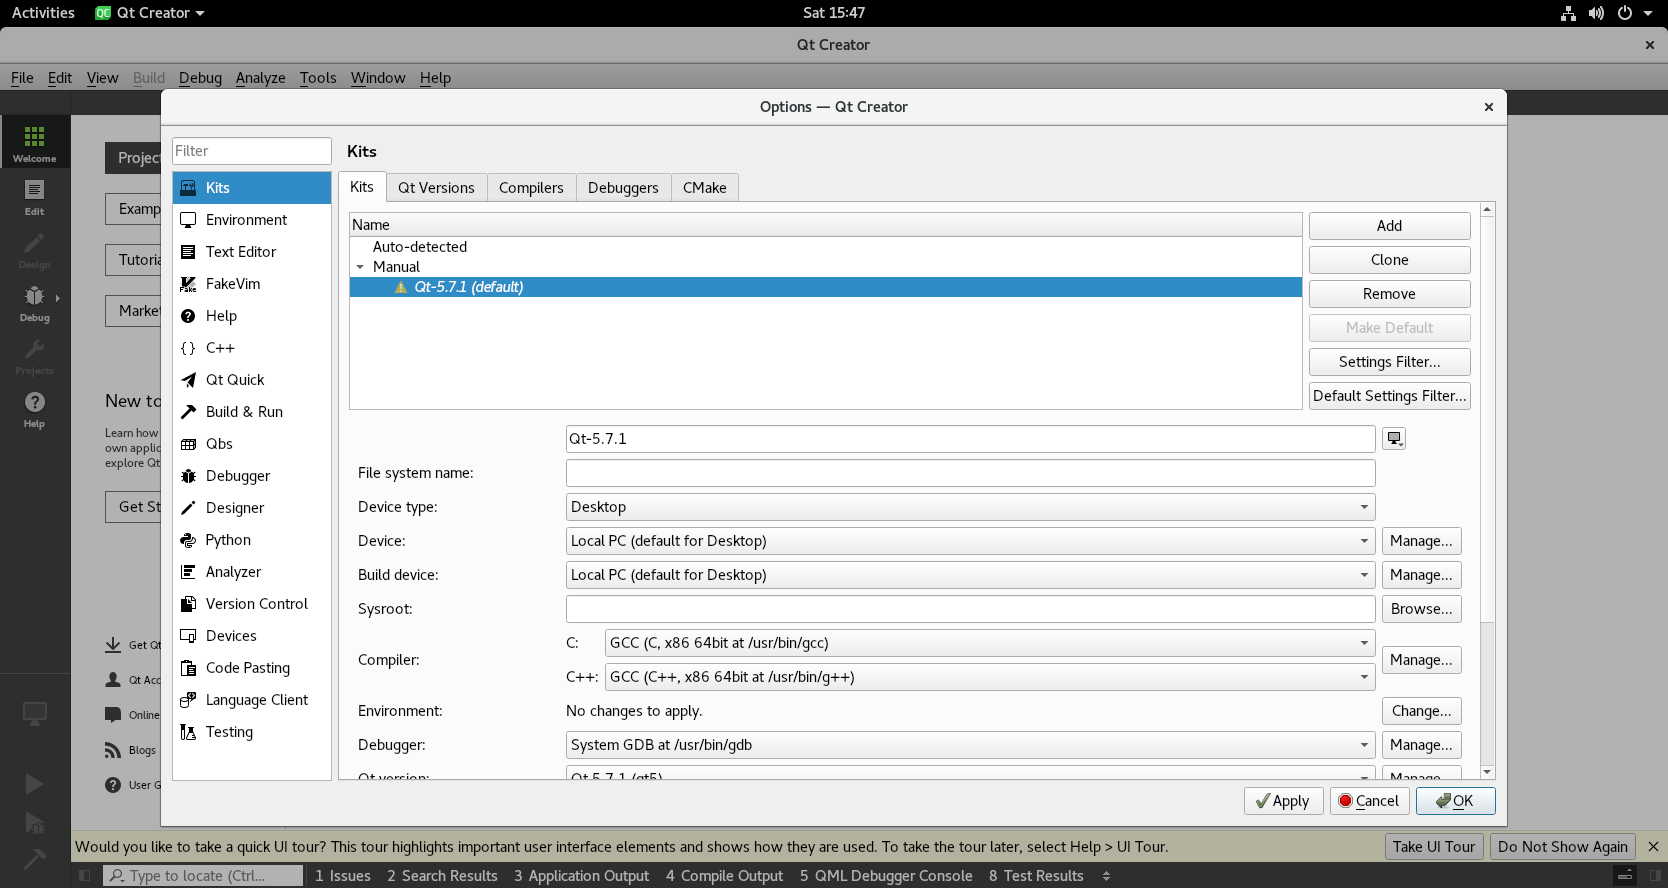
After Qt is installed, you need to further complete the Qt build configuration. Open Qt Creator, go to [Tools] --> [Options], and select the Kits tab in the pop-up dialog box.
- In the Qt Versions section, make sure your installed Qt version is listed. If no version is shown, the user needs to add it manually.
- Confirm the compiler configuration in the Compliers section. Usually, Qt Creator will automatically recognize the installed compilers, but if not, the user can configure them manually.
- Once Qt and the compiler are configured, go to the Kits tab and click the Add button in the lower left corner to create a new Kit or select an existing Kit.
Create a Qt Application
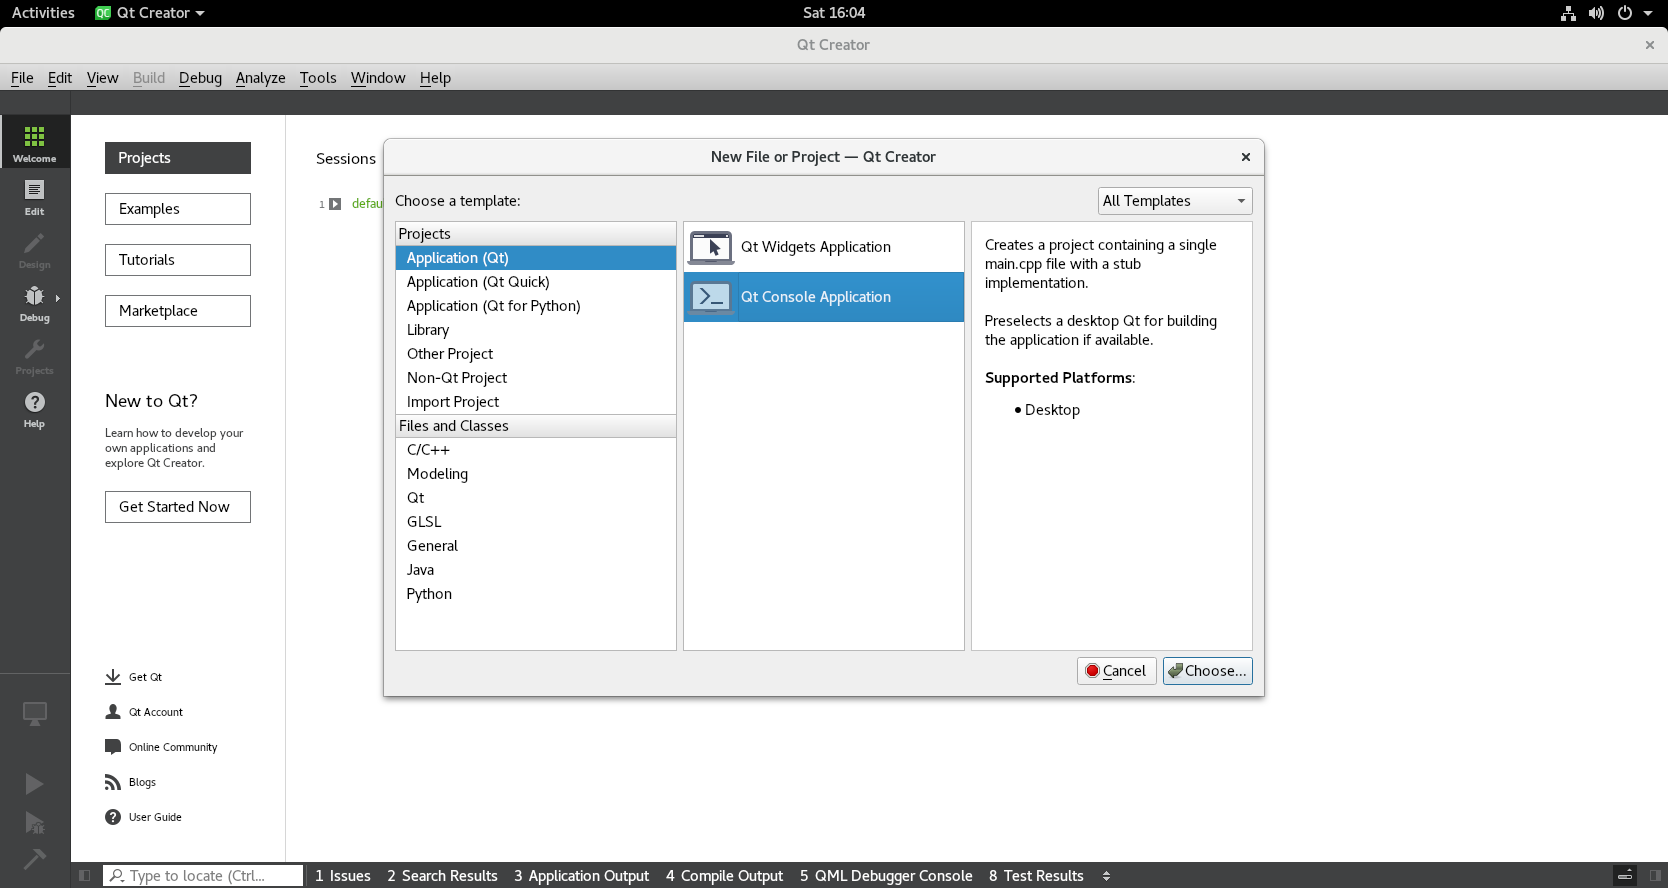
Run Qt Creator and click [File] -> [New File or Project ...] on the menu bar to create a new Qt application. In the following example, select Application (Qt) -> Qt Console Application, i.e. Qt console application, and then follow the instructions to configure it.
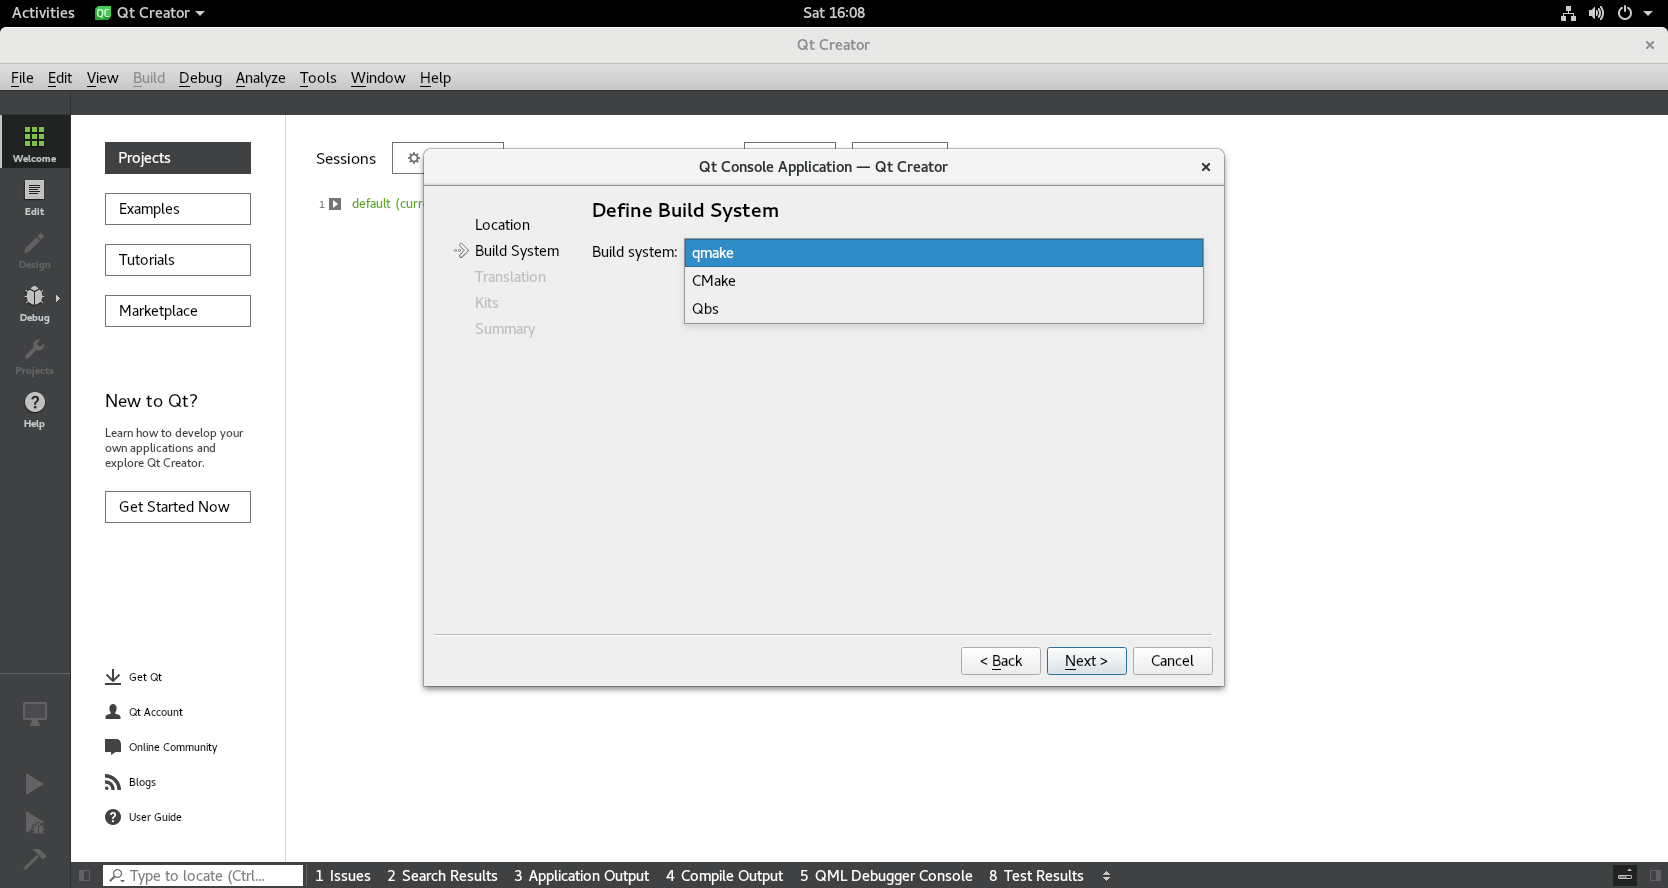
After configuring the project name and storage directory, you need to select the Build System. Qt supports multiple build systems. In this example, qmake is selected.
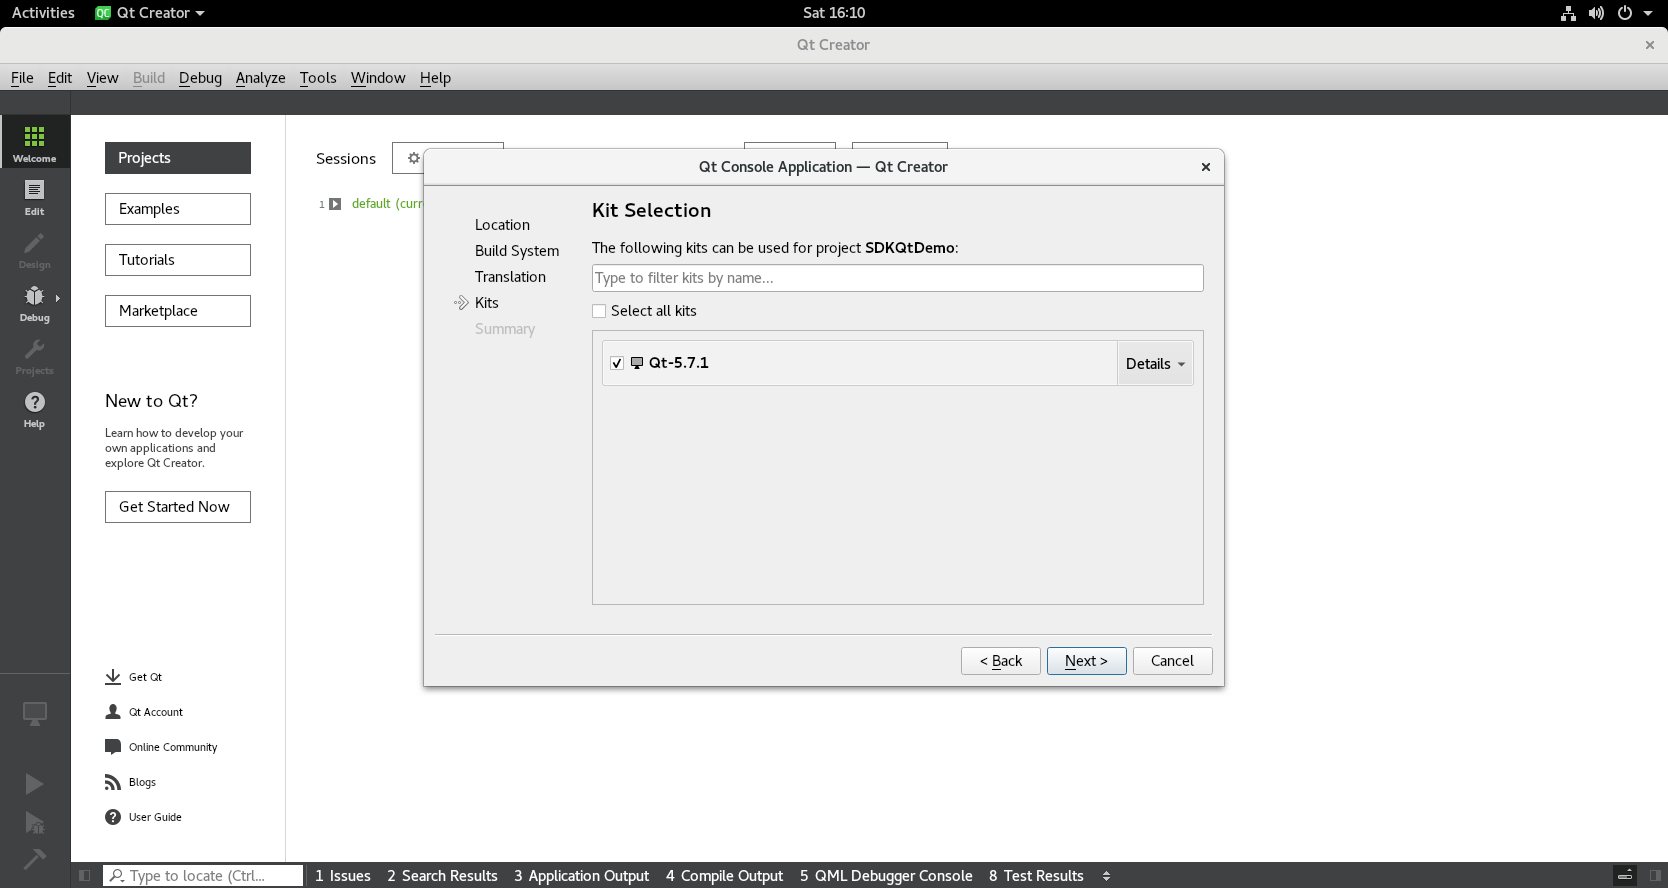
On the Kits selection interface, select the previously configured Kit, click Next and finally complete the project creation.
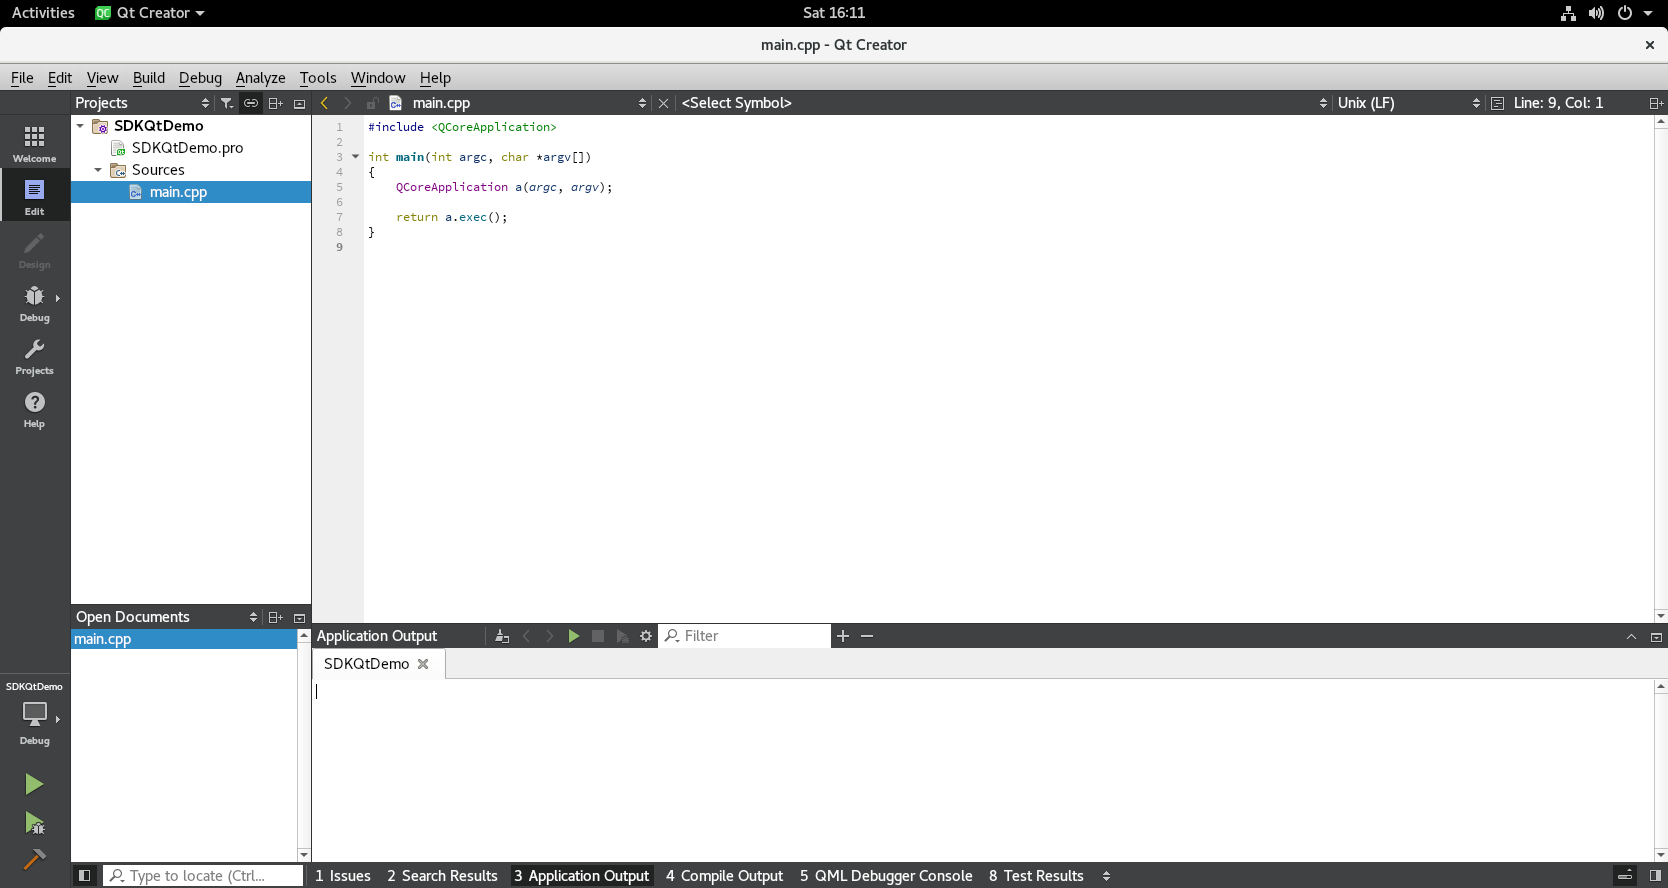
After the project is created, the initial interface is as follows.
Link Configuration for SDK
Add the header files and library files in the downloaded JAKA SDK to the project. This example is a Linux system, so copy the two folders inc_of_c++ and x86_64-linux-gnu in the JAKA SDK folder to the project directory.


Double-click the project configuration file SDKQtDemo.pro in Qt Creator to add the header files and library files required to use the JAKA SDK to the project.
The configuration added in this example is as follows:
Add the configuration line INCLUDEPATH += inc_of_c++ to add the header file directory to the project;
Add the configuration line LIBS += -L$$PWD/x86_64-linux-gnu/shared -ljakaAPI to add the libjakaAPI.so file to the project. $(PWD)/x86_64-linux-gnu/shared specifies the directory where the libjakaAPI.so file is located, and jakaAPI is the library name (i.e., libjakaAPI.so).
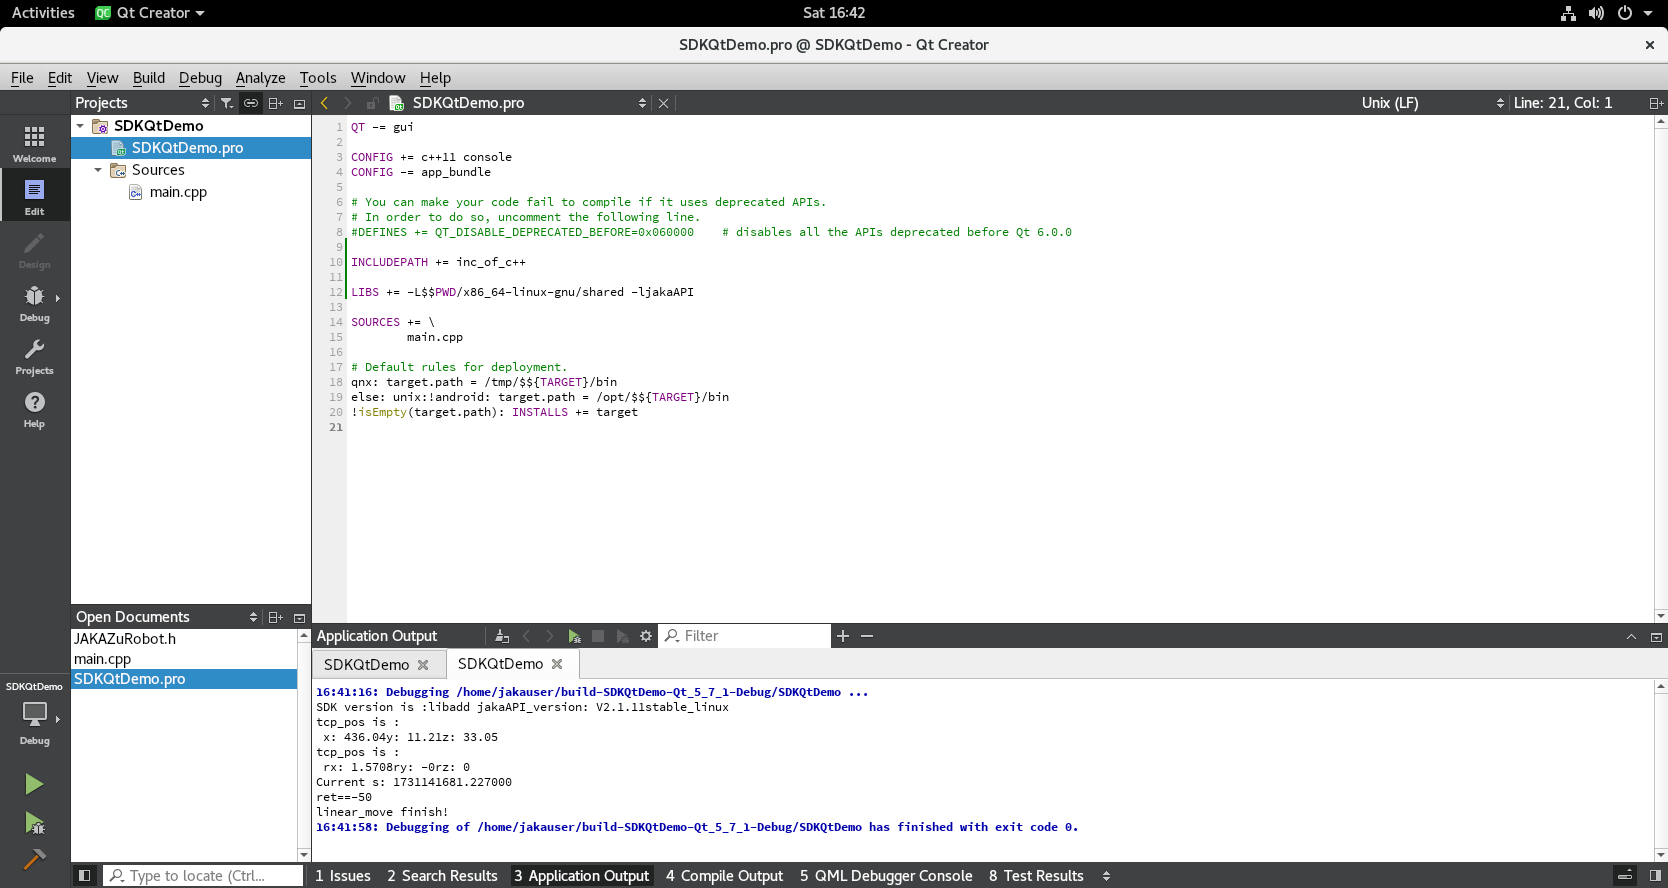
This completes the environment setup and configuration required for the Qt program to use the JAKA SDK.
Write Application and Use SDK
You can add #include "JAKAZuRobot.h" to the program and import the JAKA SDK header file to call the relevant interface. This example writes the following code for reference. Note: The IP address used in the example is the robot IP address, and the user needs to adjust it according to the situation.
#include <QCoreApplication>
#include "JAKAZuRobot.h"
#include <string>
#include <vector>
#include <iostream>
#include <chrono>
#include <thread>

int main(int argc, char *argv[])
{
    QCoreApplication a(argc, argv);


    JAKAZuRobot demo;

    demo.login_in("192.168.1.100");
    //sleep(2);
    demo.power_on();
    //sleep(2)
    demo.enable_robot();
    //sleep(2);

    CartesianPose tcp_pos;
    int ret;
    char ver[100];
    demo.get_tcp_position(&tcp_pos);
    demo.get_sdk_version(ver);

    std::cout << "SDK version is :" << ver << std::endl;
    std::cout << "tcp_pos is :\n x: " << tcp_pos.tran.x << "y: " << tcp_pos.tran.y << "z: " << tcp_pos.tran.z << std::endl;

    std::cout << "tcp_pos is :\n rx: " << tcp_pos.rpy.rx << "ry: " << tcp_pos.rpy.ry << "rz: " << tcp_pos.rpy.rz << std::endl;
    auto now = std::chrono::system_clock::now().time_since_epoch();
    auto ms = std::chrono::duration_cast<std::chrono::milliseconds>(now).count();
    std::cout << "Current s: " << std::fixed << ((double)ms) / 1000.0f << std::endl;
    tcp_pos.tran.y = tcp_pos.tran.y + 60.0;
    ret = demo.linear_move(&tcp_pos, ABS, TRUE, 10, 10, 1, NULL);
    std::cout << "ret==" << ret << std::endl;
    std::cout << "linear_move finish! " << std::endl;
    now = std::chrono::system_clock::now().time_since_epoch();

    return a.exec();
}
Compile and Run the Application
After the program is edited and saved, click the menu [Build]->[Run qmake] to generate the configuration file required for the build. After running qmake, it will prompt successful completion or exception (if any).
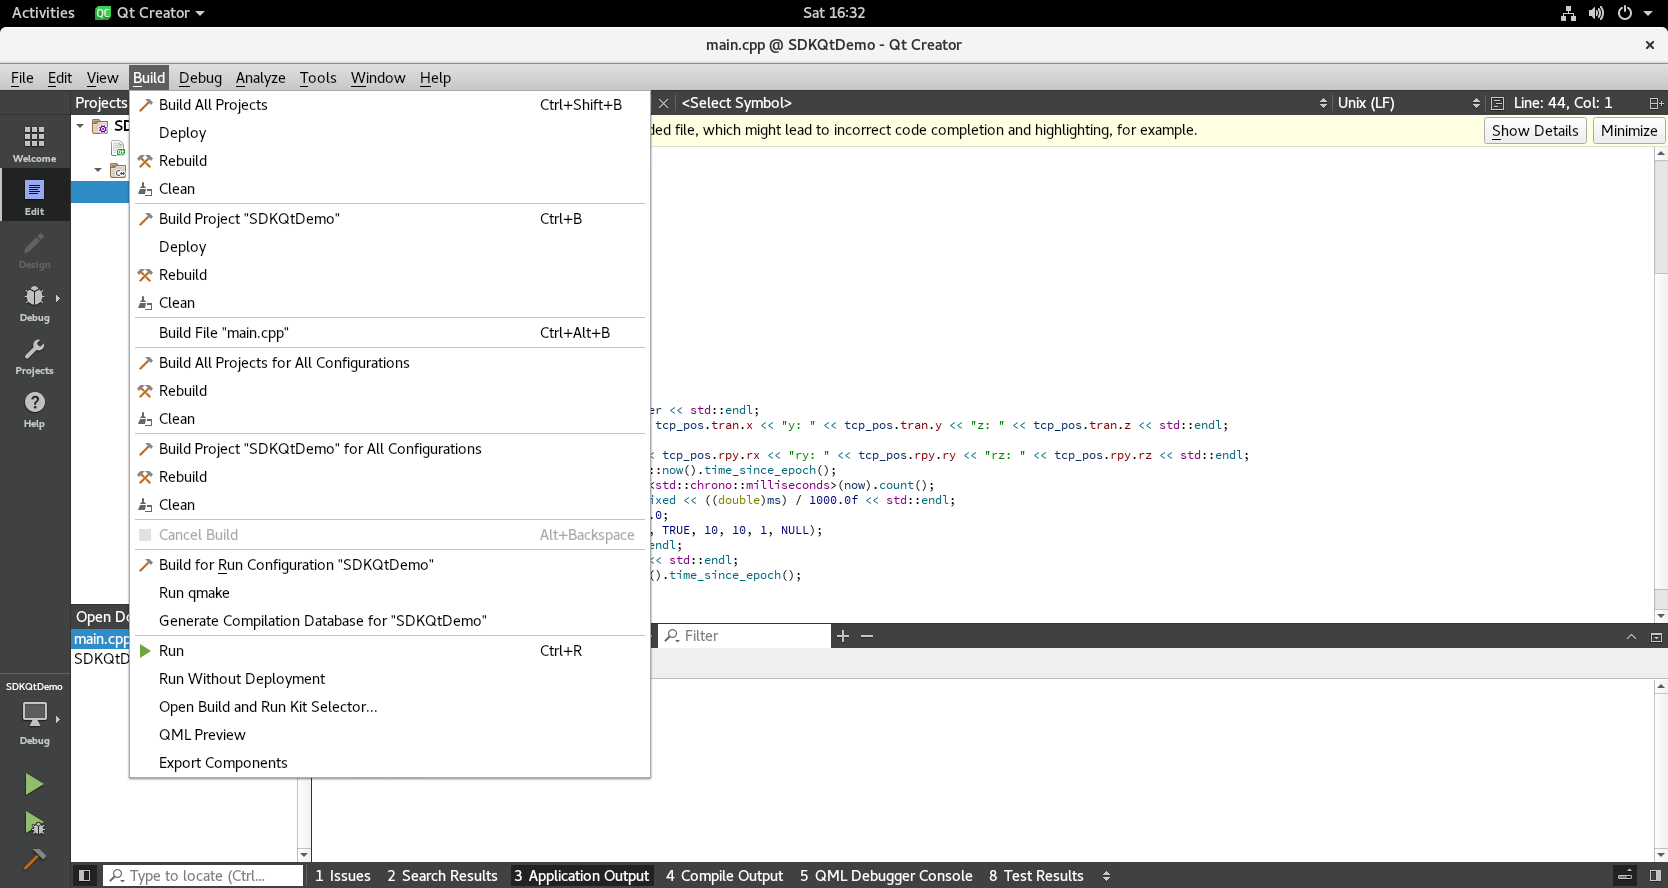
Then click [Build] -> [Build All Projects] to compile the source code and link it to generate an executable file. The Compile Output window at the bottom of Qt Creator will output the compilation results.
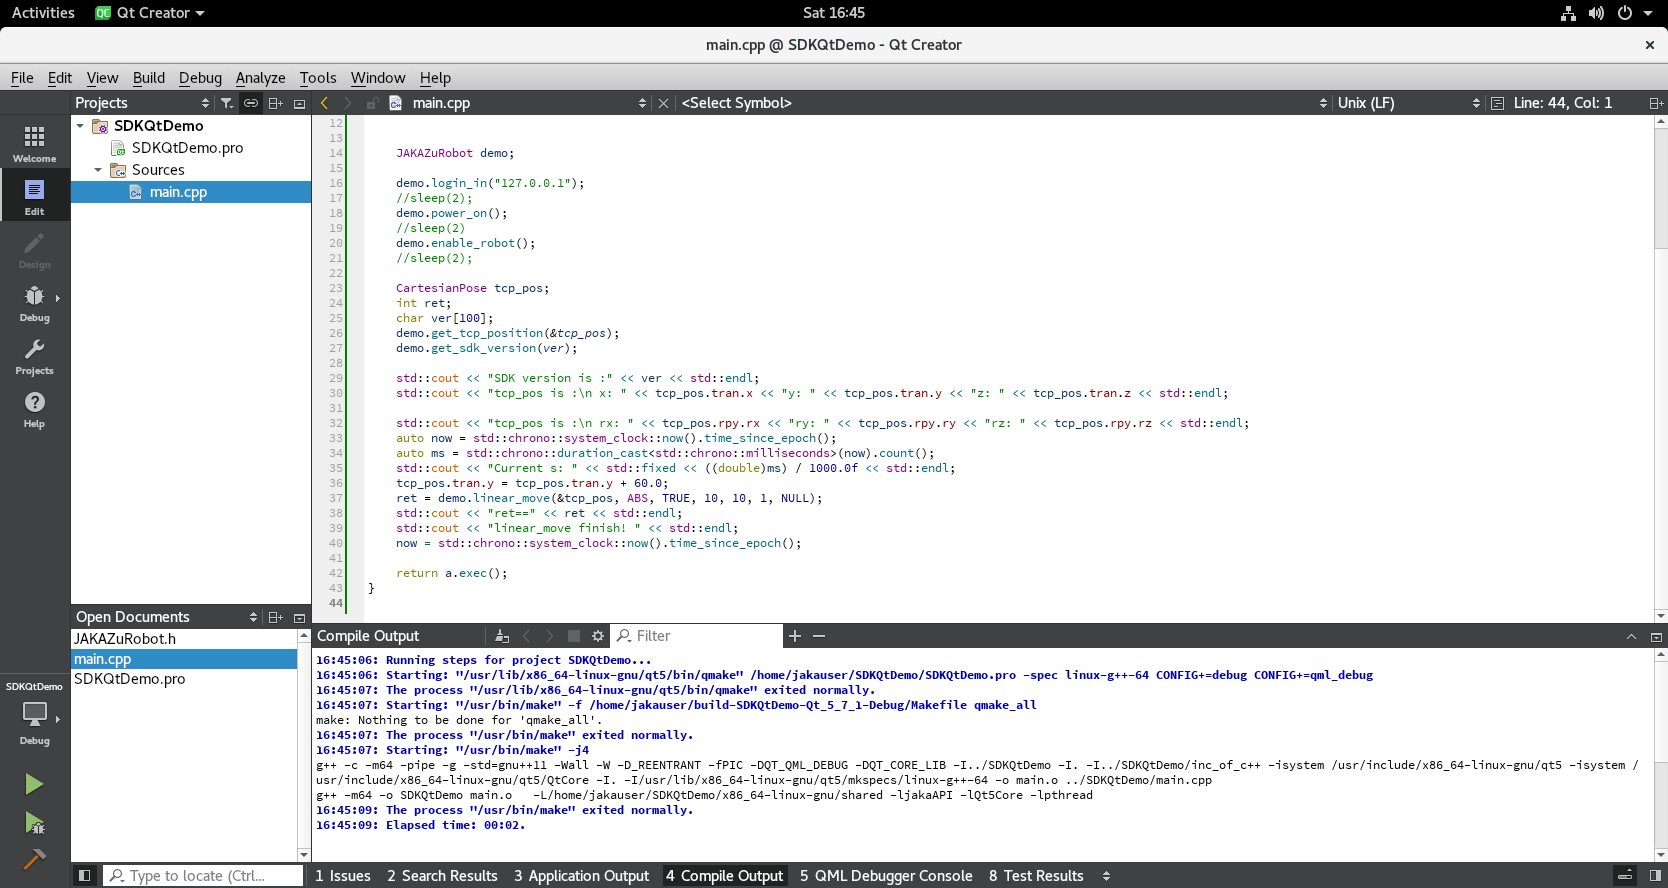
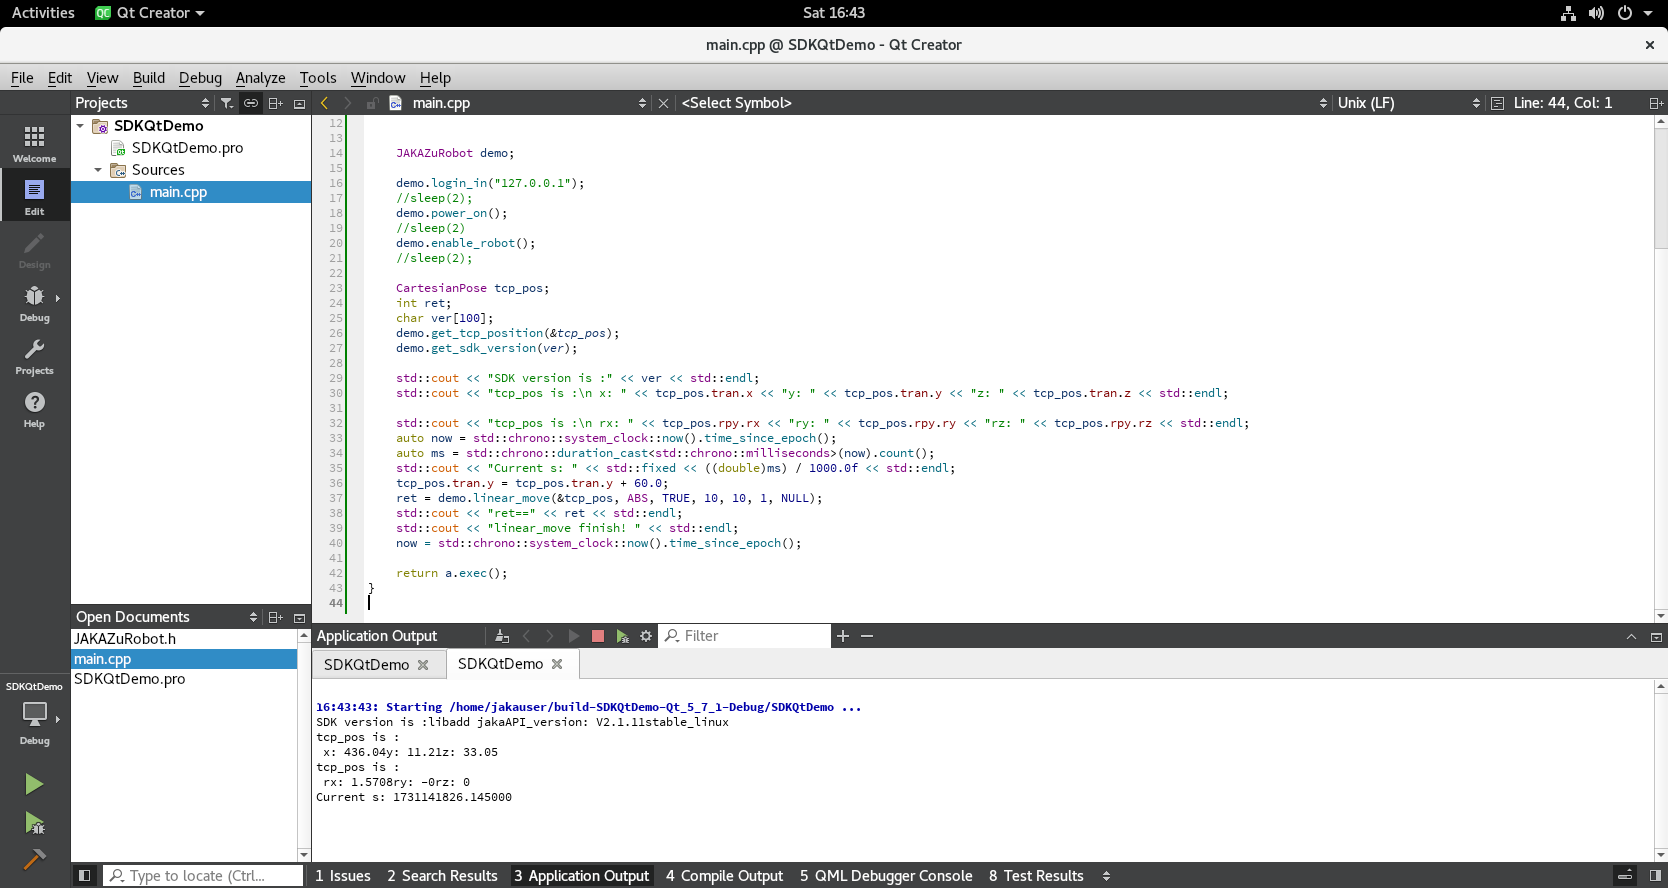
After successfully building, you can click the Run button on the left toolbar of Qt Creator to start the program. The running effect of this example is as follows.
Instructions for deploying SDK application as Addon
In order to facilitate some users to use SDK programming and deploy it in the controller to replace complex graphical programming operations, this chapter deploys and runs applications written using the Jieka SDK through Addon. Since the current Jieka Addon function is to run the Python main file and use Python 2.7 by default, but the Jieka SDK is currently compiled with Python 3 or above, there will be problems when running the Python SDK library directly under Addon. Therefore, this document mainly explains how to call the SDK application written in the customer's C++ language through Addon, and the platform is the Linux system.
Therefore, the overall idea can be divided into two steps:
Develop user programs based on C/C++ that can run in JAKA controllers;
Develop an Addon that runs in the JAKA controller and eventually calls and executes the above SDK-based user job program.
Environment Setup
During the whole process, users need to prepare two development environments to complete the above two steps respectively:
SDK-based user program development environment;
JAKA Addon development environment.
Setup SDK Application Development Environment
For this part, please refer to the process described in 3.2 Creating C++ Applications with CMake on Linux for preparation.
Setup Addon Development Environment
First, prepare a demo developed by JAKA Addon (see the link below for download). After decompression, there are the following directories and files. The most important ones are the two files marked in red. Addon_Demo.py is the main Python program, which is the entry program for the entire Addon runtime. Addon_Demo_config.ini is the Addon configuration file, which contains some configuration items about this Addon.
For detailed introduction of Addon, please refer to the relevant page of the Jaka Documentation Center: [https://www.jaka.com/docs/guide/addOn/1.2-AboutDev.html]

Development and Deployment
The following demonstrates how to deploy the development environment of JAKA SDK C++ under Linux. This development deployment requires the use of CMake tools. Readers are requested to download, install and configure them by themselves. The following explanation assumes that the reader has completed the configuration and has a certain development foundation.
Write User Application
The writing of user operation programs can refer to the process described in 3.2 Creating C++ Applications with CMake on Linux to create an executable program that can run in the robot controller environment. In this example, it is assumed that the user-developed operation program executable file is demo.
Run SDK Application from Python
At this point, you need to write Python code in the Addon's Python main program to call the C++ executable program. The following are two ways for users to implement the call (Note: the default Python running version in the controller system environment is Python 2.7).
- Run via the subprocess module
import subprocess
import os
if __name__ == '__main__':
    # way 1
    args = ['./build/demo']
    result = subprocess.call(args)   # python2
- Run via the os module
import subprocess
import os
if __name__ == '__main__':
    # way 2
    args = ['./build/demo']
    os.system('./build/demo')
The above is an example of running the SDK program through the JAKA Addon framework. ./build/demo is the path of the user-developed program executable file under the developed Addon.
Run SDK Application as Addon
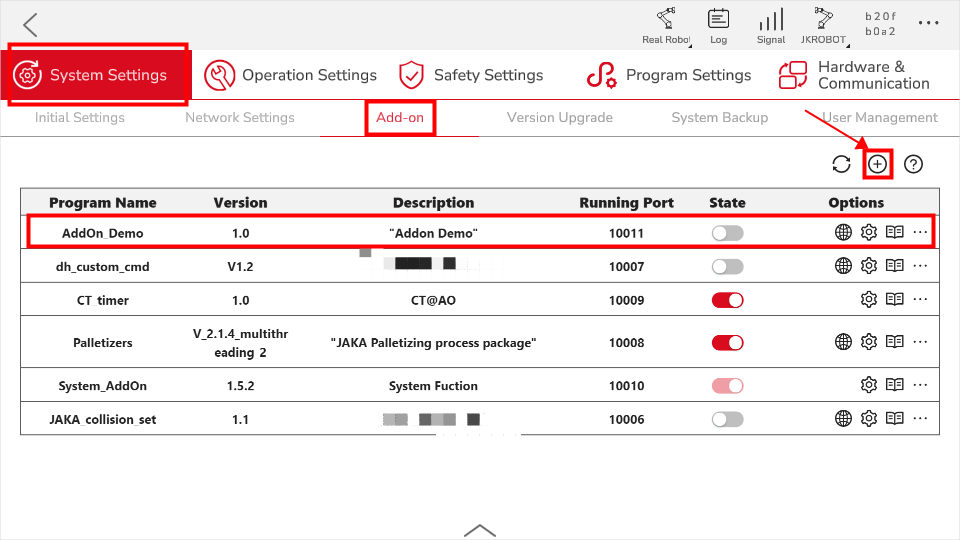
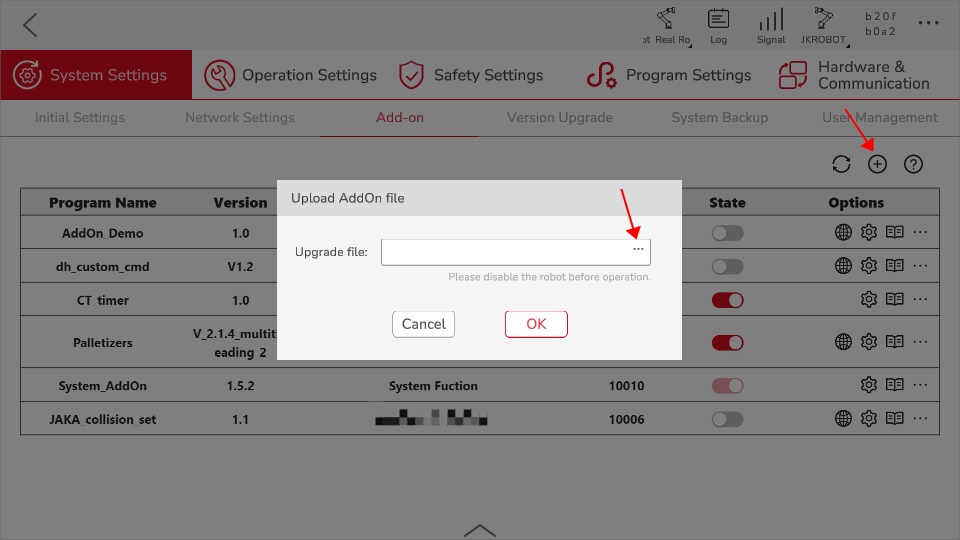
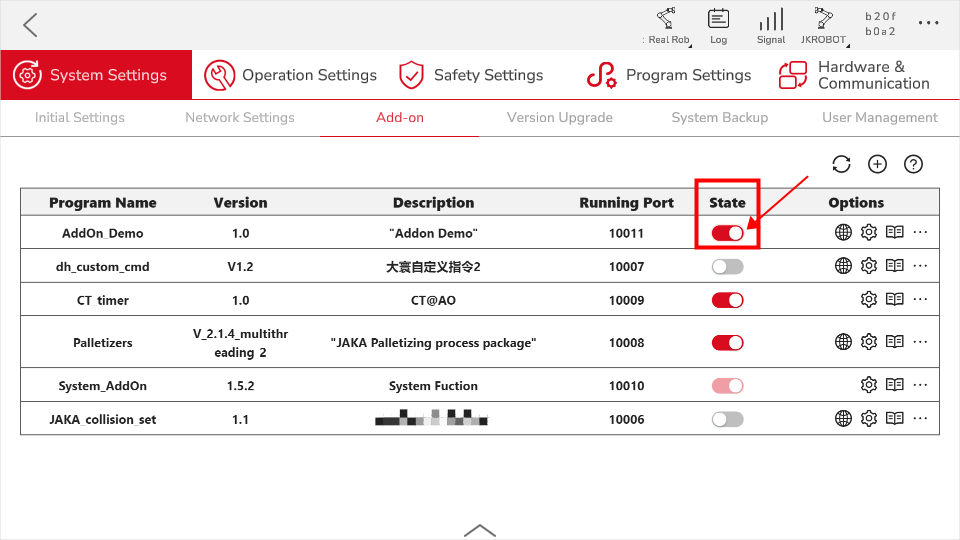
After writing the Addon, the user needs to package the project into tar.gz format to form an Addon software package. Then open the JAKA App software, You can go to [Settings]-->[System Settings]-->[Add-on], enter the add-on management interface, upload the Addon package to complete the installation. After the installation is complete, the user can control the start or end of the Addon on this page.
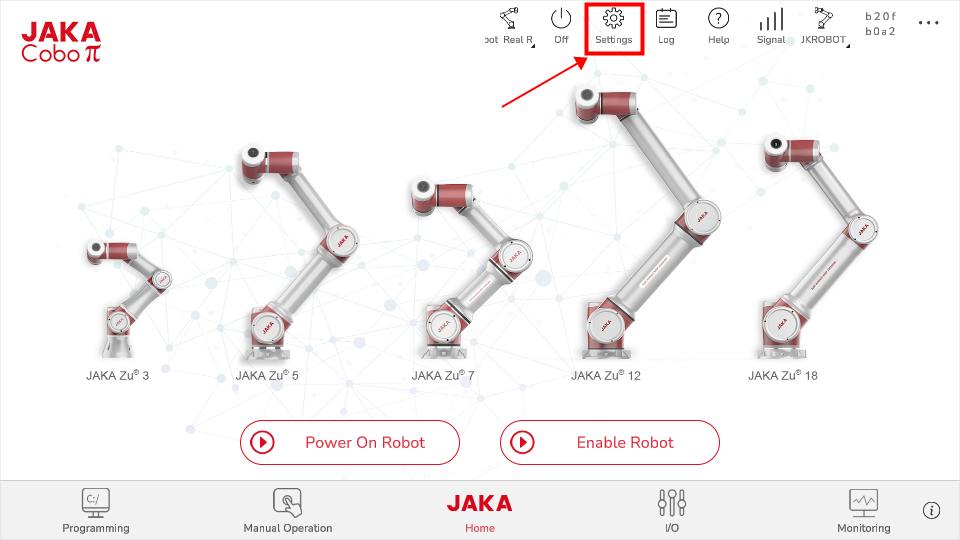
Select the Addon package in the local directory and wait for the file to be uploaded successfully.
Use the toggle button under the Stat column to turn this Addon on or off.
Precautions
When developing user applications based on SDK, you need to pay attention to the system architecture of the current control cabinet. JAKA controllers based on Debian Linux may have two configurations, x86 and x86_64. You can connect to the controller through the JAKA App and check the controller version suffix to obtain the specific information;
If the SDK application was deployed on the controller, it will share the resources with the existing JAKA controller and other system services. Users need to plan resource usage reasonably, including the use of CPU, memory, and disk space, to avoid affecting the robot control system.
