JAKA Palletizers User Guide
JAKA Palletizers User Guide
Getting Started
Set pallet UCS and gripper TCP
Before programming, the user coordinate system (UCS) of the pallet and the TCP of the tool center need to be calibrated. The purpose of calibrating the pallet UCS is to give a reference position for palletizing. The purpose of calibrating the TCP is to make sure the box can be well placed in the correct position. UCS and TCP only need to be set once if the position of the pallet and the end tool (Gripper) are not changed. It can then be used directly for all palletizing tasks.
step 1
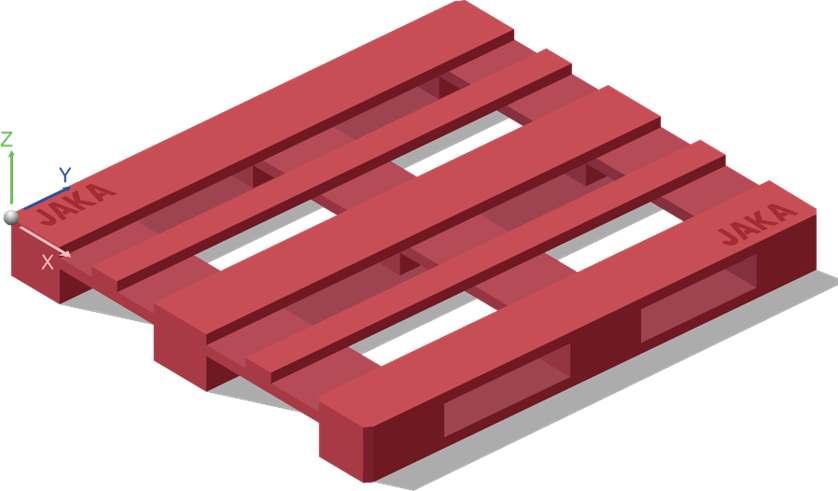
Calibrate the user coordinate system to the corner of the pallet surface. Pay attention to the X,Y direction chosen for the pallet.
step 2
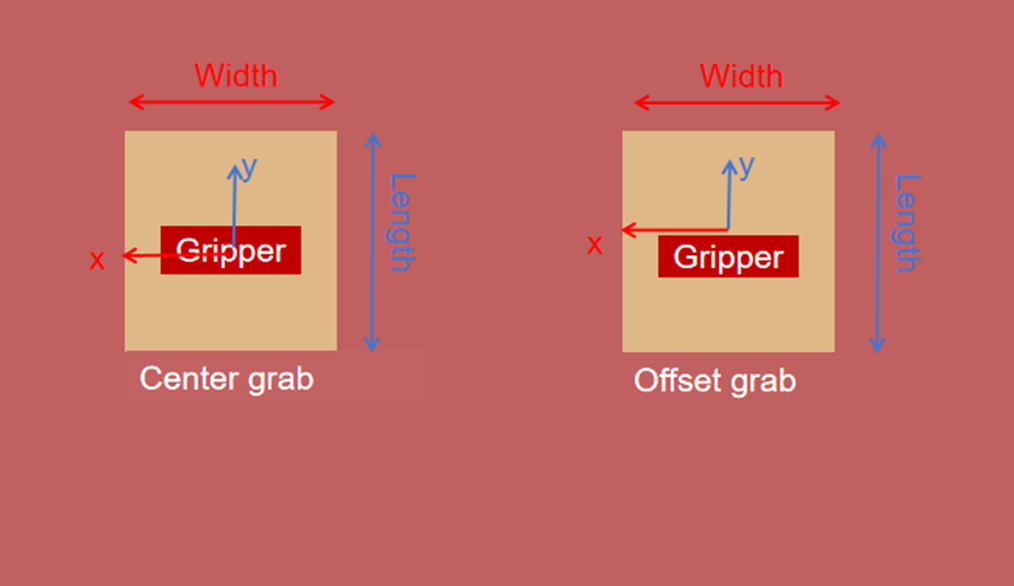
Mount the gripper and set its TCP, then calibrate the TCP to the box center, with the width direction of the box as the X-direction and the length direction of the box as the Y-direction.
Configure the palletizing parameters
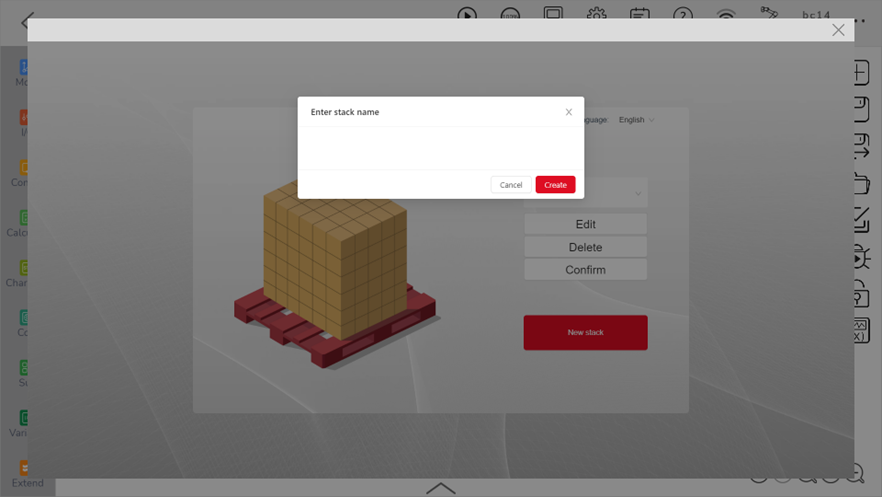
Create a new stack
Click the palletizing instruction, enter the palletizing process configuration page, click “New stack”, enter the stack name, and click “Create”. Only English input is supported; only underscore “_”, English letters, and numbers can be used.
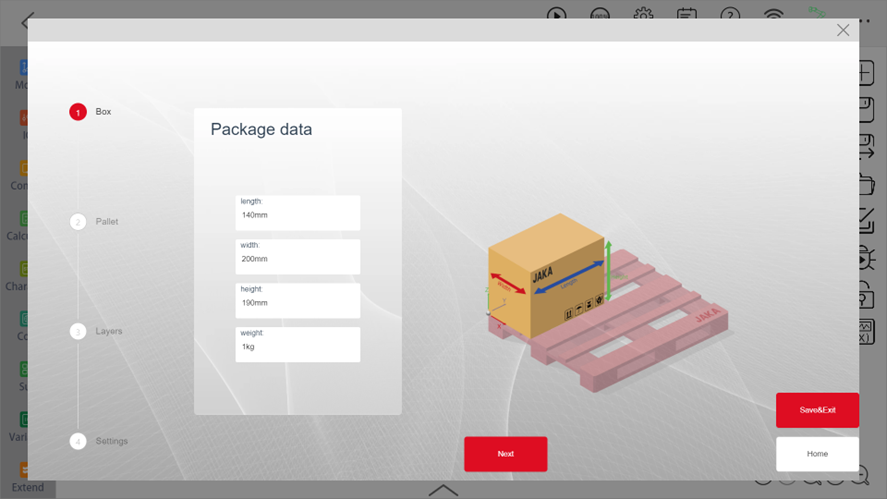
Define the box
Fill in the length, width, and height of the box. The payload will automatically adjust during palletizing.
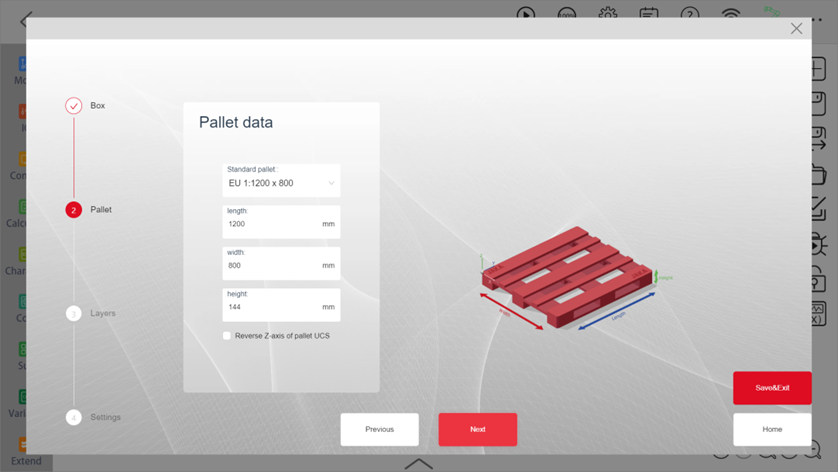
Define the pallet
Fill in the pallet parameters according to the corresponding relationship between the coordinate system in the diagram on the right and the length, width, and height of the pallet. The user can select a pre-set standard pallet in the standard pallet drop-down menu.
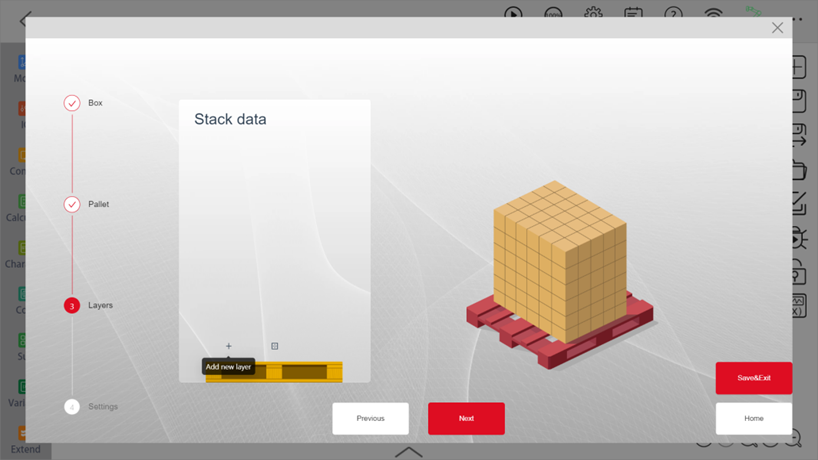
Define stack type
New layer and shim paper can be added on this page. After adding the shim paper, the related points and signal will be shown in the key points settings and signal settings. Click “+” to enter the edit page of this layer.
Edit Layer type
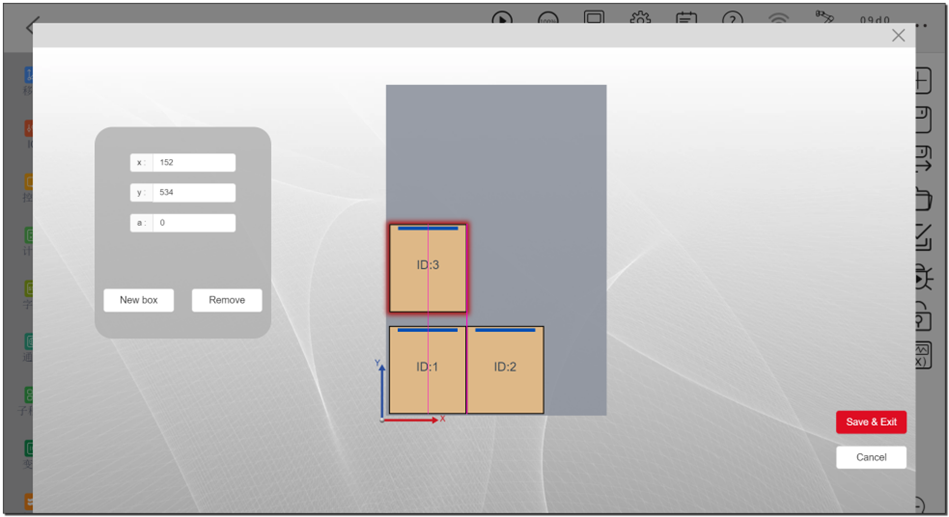
Click “New box” to create a new box on the pallet; Click “Save & Exit” will return to the previous page. To remove the box, select it first, and click “Remove”.To adjust the box, drag to move, double-click to rotate, or enter the coordinates in the coordinate bar. When the palletizing program is executed, it is in the order of the box ID from small to large.
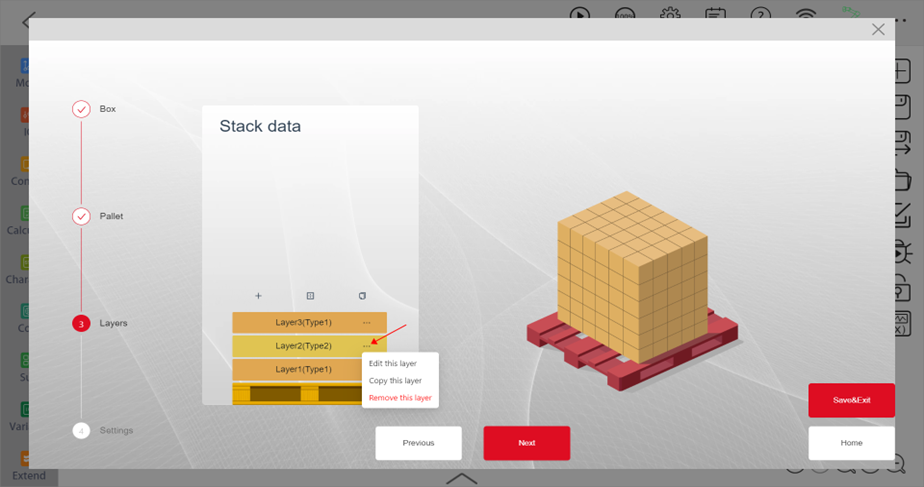
Edit stack type
Adjust the stack type by dragging the layer, or by copying, removing function in the layer type menu bar.
Signal settings
All input signals (DI) below are effective at high level, click the box on the left to select the needed signal. The signal monitoring service will start when the user’s palletizing program in the App is running, and stop the service after the program execution is completed. Please keep all input signals at high level for more than 0.5 s, otherwise it may not be detected. All signals are indexed starting from 1. For example, if the user wants to use the control cabinet DO 1, just select control cabinet and enter 1 in the input box.
- Box ready: Continuous waiting for this signal above the pickup point, continue running when the signal is high.
- Box missing: Output high level signal when the “Box ready” signal is low.
- Pallet ready: Continuous waiting for this signal after reaching the pallet entry point, continue running when the signal is high.
- Pallet missing: Output high level signal when the “Pallet ready” signal is low.
- Shim paper ready: Continuous waiting for this signal above the shim paper picking position.
- Shim paper missing: Output high level signal when the “Shim paper ready” signal is low.
- Gripper detected: The detected signal of the gripper.
- Gripper signal: The signal that controls the close and open of the gripper.
- Pallet reset signal: The signal to reset the “Pallet done” signal.
- Pallet done signal: Continues to wait for this signal after reaching the pallet entry point and continues to run when the level is low (palletizing is not completed). When the internal count of the palletizing package is equal to the real count of the palletizing, output a high-level signal.

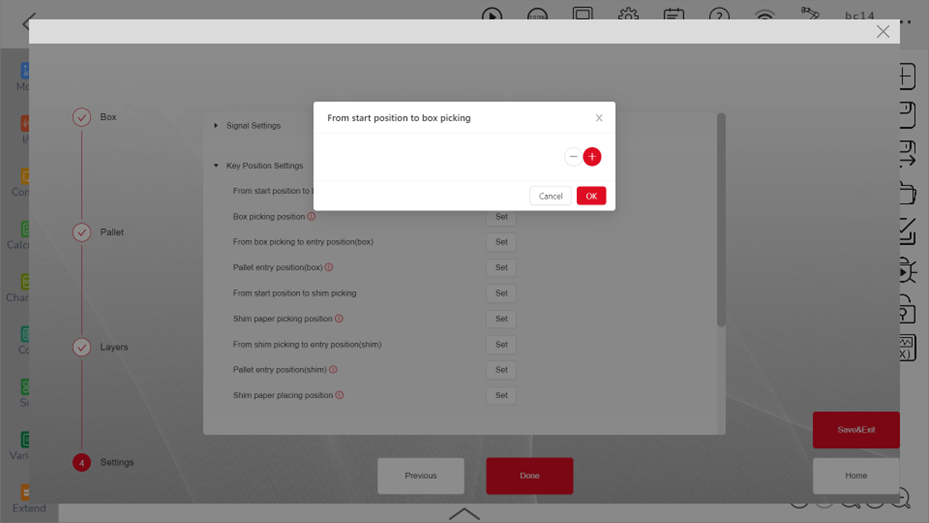
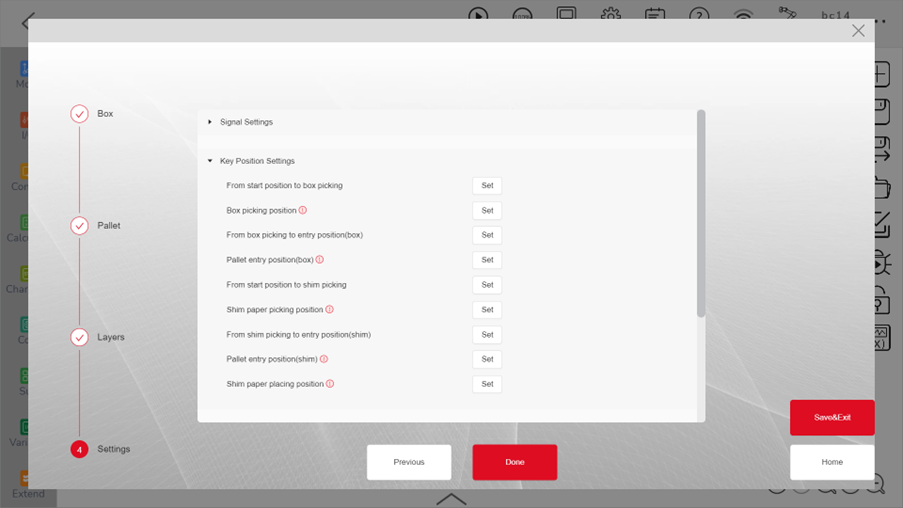
Key position settings
The points with a red exclamation mark behind are the points must be set, after the setting is completed, the mark will change to a green check mark.

    Note:
    Before setting points and positions, make sure the robot is enabled.
    If you need to switch to the home page to enable the robot, please save all your settings first, otherwise they would be lost.
    When the JAKA controller software version is 1.7.0.x, moving the robot on the disable status will automatically jump to the home page,
    resulting in the previous data not being saved. So you should remember to save the settings.
From start position to box picking
A series of transition points can be set, starting from the last point in the program before executing the palletizing command, to the point above where the box will be picked. Any number of points can be added, depending on the actual need.
- Box picking position As shown in the figure, teach the gripper to the position of pick up position, save as the box picking point. Note that the X-axis of TCP should point to the width of the box.

    Note:
    When using the unpalletizing instruction, this point is actually the placing (unloading) point.
From box picking to entry position (box)
A series of transition points starting from the top of the box picking point and ending at the pallet entry point.
Pallet entry position The pallet entry point is a common transition point, the last point before entering the pallet and the first point after exiting the pallet. The height (z) of this point will be adjusted in real time according to the height of the stack, but the lowest point will always be the position set by the user. Generally this point should be set outside the pallet, but it can also be tested and adjusted according to the actual situation.

From start position to shim picking A series transition points before picking the shim paper.
Shim paper picking position Similar to the picking point, the pre-picking point and the after-picking point are created after setting pick up point offset.
From shim paper picking position to entry position (shim)
A series transition points between shim paper picking position and pallet entry points.
Pallet entry points (shim)
The point before going to the pallet, the same function with pallet entry point (box).
Shim paper placing position The point to place the shim paper, the Z direction will calculate automatically according to where the shim paper is, only need to consider adjusting the X,Y direction.
Pickup point offset setting
Set the picking point offset parameter and define the position to which it should be raised before picking (No-load) and after picking (load) (relative to the taught picking point). The unit of the offset distance is mm. The palletizing AddOn will automatically add the distance to the picking point to generate the pre-picking point and after-picking point.
No-load pre-point Z-offset
The distance to generate the pre-picking position.
Load pre-point Z-offset
The distance to generate the after-picking position.

Placing point offset setting
Pre-point X offset & Y offset
In order to ensure that boxes can be safely placed without squeezing other boxes, the offset parameters in the X and Y directions are enabled. This offset parameter will only take effect before unloading during palletizing.
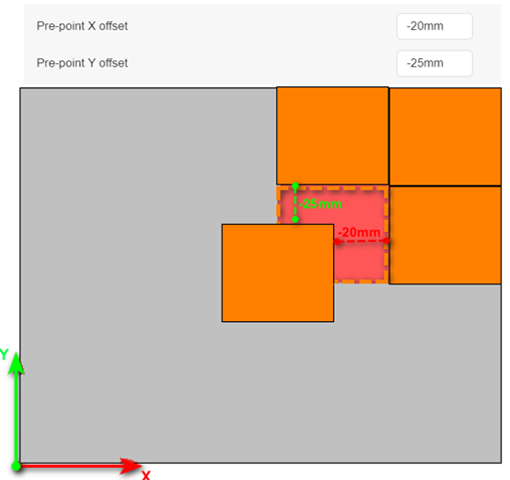
    Note:
    Before setting the offset parameters in the X and Y directions, make sure that the boxes are placed in a reasonable order to avoid collisions.
    The default value is 0, meaning drop vertically above the placing position.
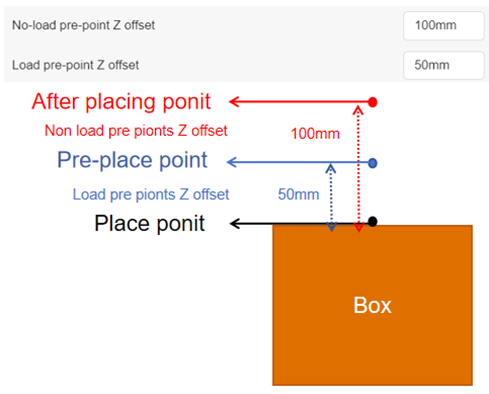
No load pre-point Z-offset
The distance to generate the after-placing position.
Load pre-point Z-offset
The distance to generate the pre-placing position.
Delay time setting
Picking delay time
The delay time after starting to pick the box.
Placing delay time
The delay time after starting to place the box.
Box ready delay time
The delay time after the box ready signal is on.
Motion setting
Arc transition
Parameters for the arc transition between all motion in the palletizing process. Note: Because signal waiting and socket communication will interrupt arc transition, some motion segments cannot perform continuous motion and arc transition.
Empty load speed
The speed at which there is no box at the end of the robot.
Loaded speed
The speed at which there is box at the end of the robot.
Before picking/placing reduce distance
Deceleration distance before picking or placing: Start the deceleration movement at a certain height above the picking or placing point.
  Note:
  When this distance is greater than the height of the pre-picking point, the pre-picking point will be raised;
  When it is greater than the pre-placing point, the deceleration distance is equal to the height of the pre-placing point.
Before picking/placing reduce to
Deceleration speed before picking or placing: Start the deceleration movement at a certain height above the picking or placing point and reduce the speed to the setting speed.
Program
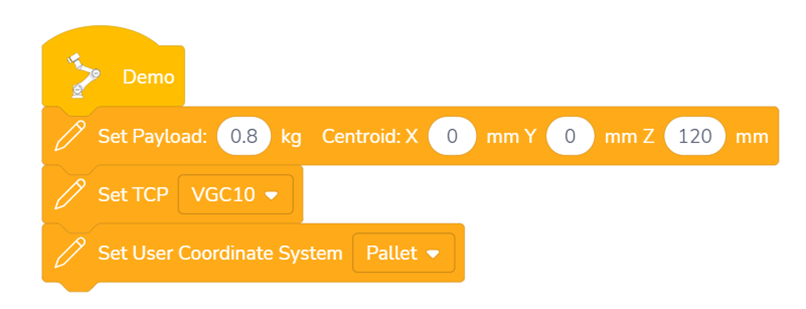
Initialize payload and coordinate system
In order to switch payload correctly when palletizing, the payload need to be initialized. The weight in the beginning is the weight of the end tool, and the offset is the TCP center of the tool. No need to change the payload every time, it automatically changes in the palletizing AddOn. It is necessary to switch to the correct coordinate system and TCP so that the palletizing program knows the position of the tools and pallets.
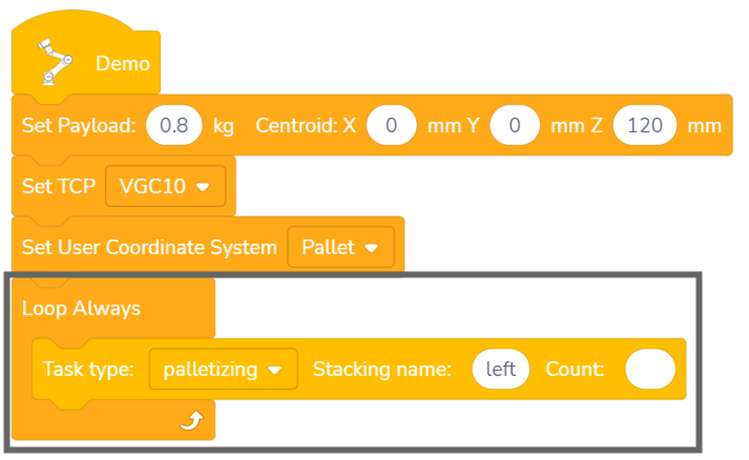
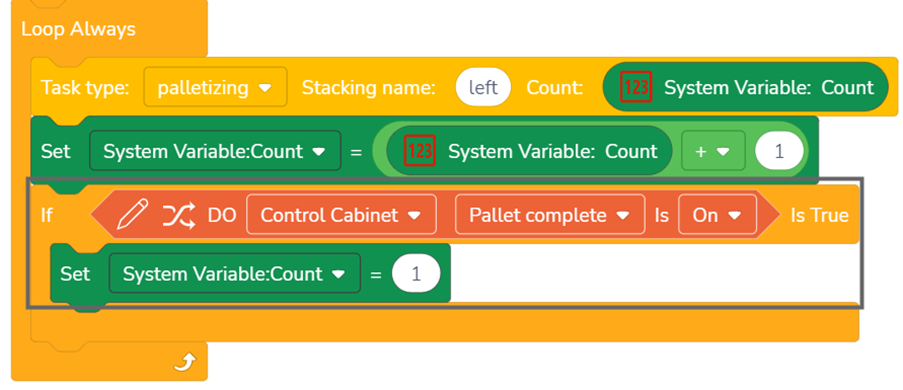
Add loop instruction
A loop instruction need to be added to make sure the robot can continuously pick and place the whole stack.Click the palletizing instruction, choose the existing stack or create a new stack in the configuration web page.
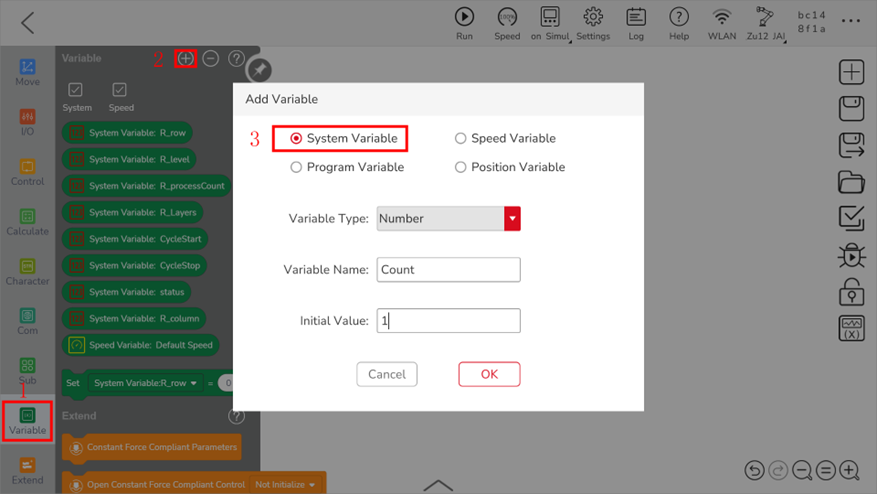
Add pallet count variable
Enter the number in the right count box to pick the specific number of the box. If not input the count variable, there will be an error when saving the program. A system variable would be a better choice for the count box, it can be accumulated in each loop, and the data can be saved when the program stops, so the robot can continue from the last pick.
Compete the loop structure, the count variable will add 1 after every loop.

Palletizing completion detection setting
There are 2 ways to reset the count number and stop the program.
- One is to check the count number and end the loop.
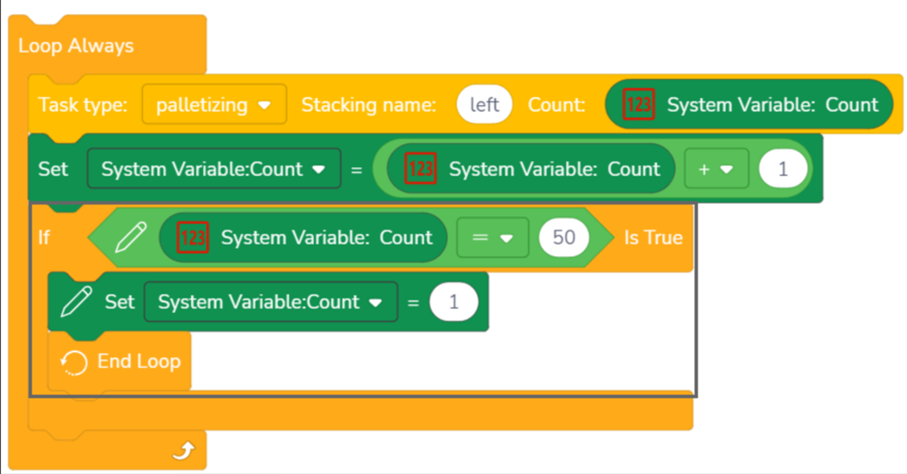
- The other is achieved through the pallet completion signal and the pallet reset signal. After completion, the “Pallet Reset” signal is used to continue the palletizing.
For more program examples, please refer to “More Examples”.
Advanced
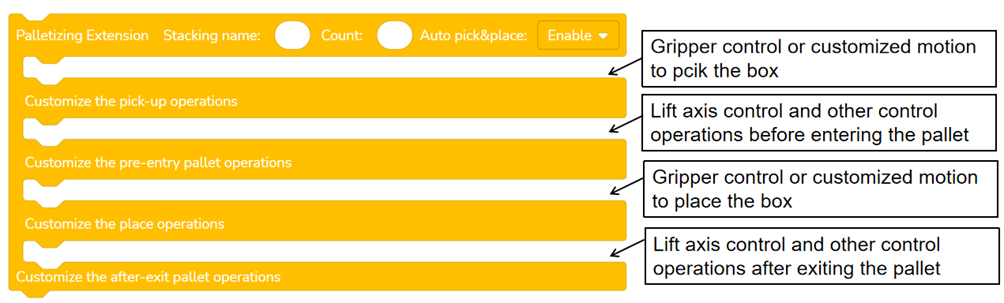
Extension instruction settings
There are some limits for the basic palletizing instruction:
- End tool (gripper) that is controlled by multiple signals or communication methods;
- Lifter that needs to be controlled during palletizing;
- Customized motions that need to be defined for picking or placing, etc.
Basic palletizing instruction does not support adding signals or customized motion for this kind specific use. Normally, palletizing extension instruction can add customizedcommands as shown below, the same also applies to the unpalletizing extension instruction.
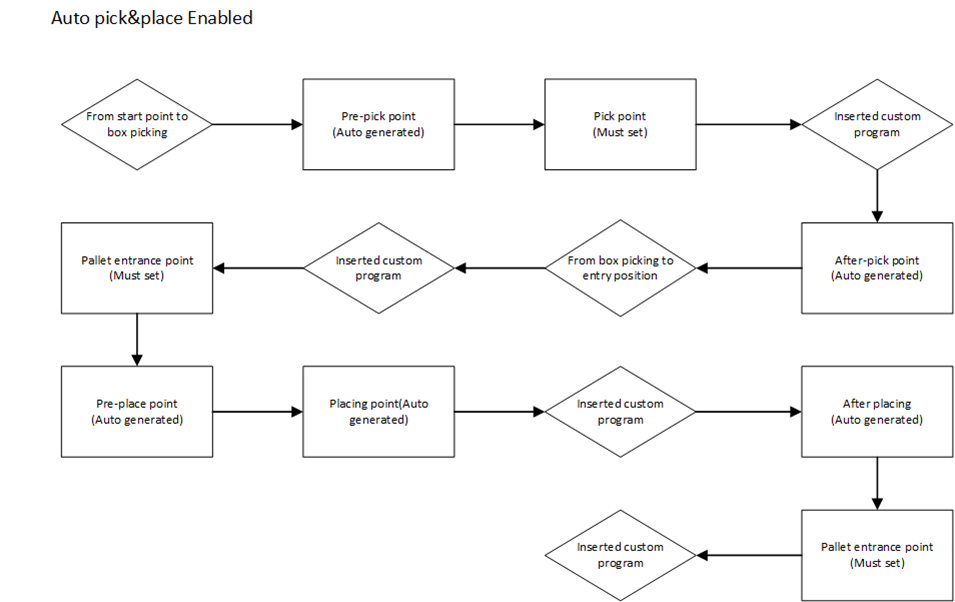
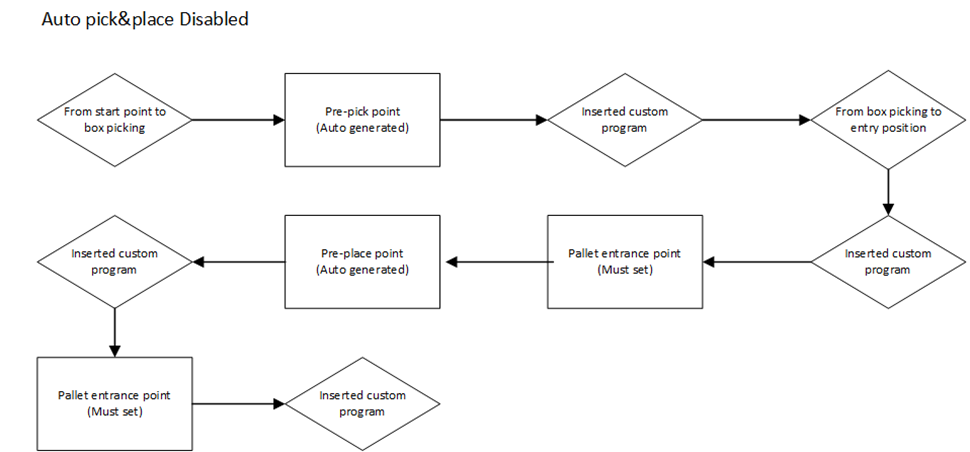
Palletizing point sequence
The following is the point sequence of the palletizing extension instruction after taking into account key point settings and inserting the custom program.
More examples
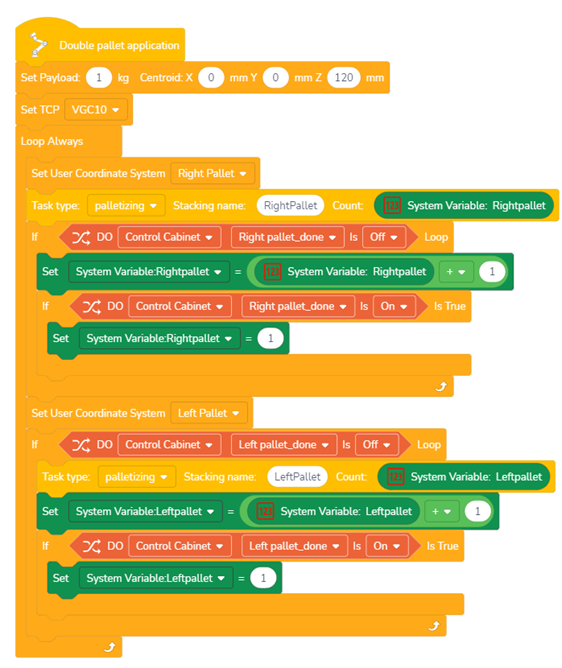
Double pallet application
Here is the example program of double pallet application, creating 2 UCS for right pallet and left pallet, and one robot can work with 2 pallets. One basic instruction is good enough for this application.
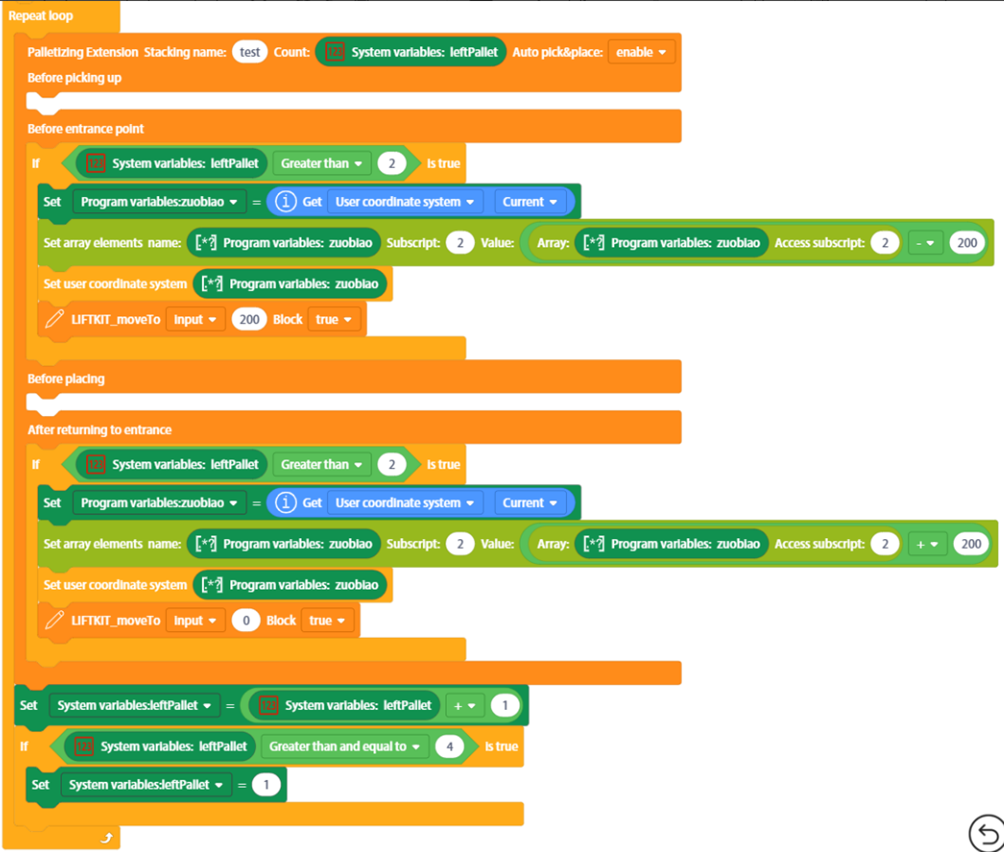
Palletizing application with lifter
Below is an example program added with a seventh axis.
FAQ
Fail to access the configuration web page
JAKA App bug
If you open the AddOn page after opening the app for a long time without any operation, there is a probability that it will be stuck in loading, and then you can only solve the problem by restarting the app.
Using VPN/VPS
This page can not be loaded when using VPN/VPS. You need turn off VPN/VPS connection.
Fail to save the program
palletizing AddOn not running
Go to the AddOn page, make sure the palletizing process package is running.
The count box on the instruction block empty
Fill in numbers or variables in count box
There are no layers or boxes in the stack type.
Check whether there is a layer in the stack type and whether there are boxes in the layer.
Signal and points parameters are missing when adding a new instruction
Use a new instruction block.
When adding a new instruction, these parameters need to be configured again. For better compatibility and flexibility, not all parameters are bound and saved with the palletizing type in the palletizing process package. Some are saved on the instruction block.
  Parameters saved on the instruction block:
  * Reverse Z-axis of pallet UCS
  * Signal settings
  * Key point settings.
The boxes are pressed when placing materials on the pallet
Incorrect box height
Check if the box height in the setting page is correct.
Incorrect UCS setting for the pallet
Check that the UCS is located on the surface of the pallet and not above or below it.
The placing position shifts after the box is rotated
The TCP does not coincide with the center of the box.
Reteach TCP or adjust the gripping position.The only way to rotate the box without shifting it is to coincide the TCP at the box centre point.